From the Project and Specifications Window, highlight the Project or Location within the Project for which the new treatment will be quoted and click the Quick Quote button.


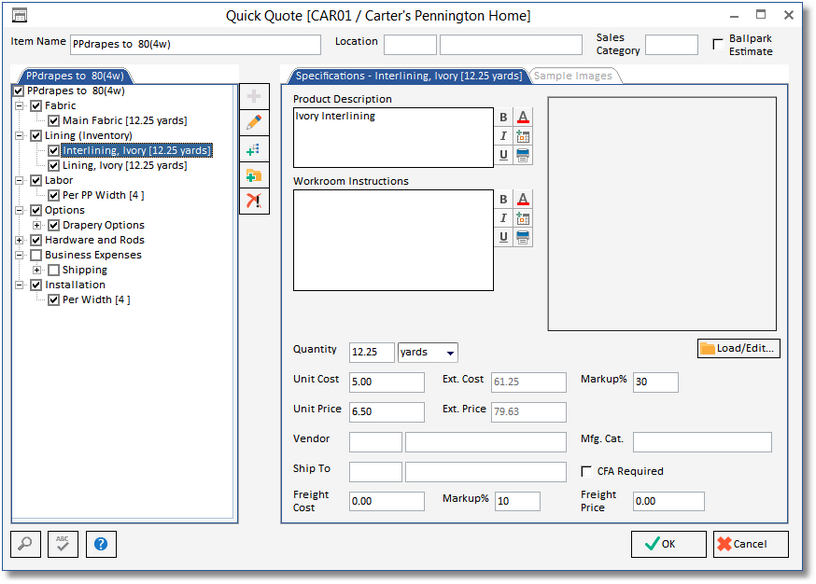
Doing so will launch the Quick Quote Window shown below.

The Ballpark Estimate option in the top right corner of the Quick Quote Window is an invaluable tool in providing an estimate to your Client while you are actually meeting with them! Clicking the Ballpark Estimate option prevents the Estimated and Extended Costs and Freight Costs from being displayed on the treatment itself and all of its Components. This way, you actually craft a treatment in front of your Client without revealing the true cost from your Vendors on merchandise, fabric, and labor! Be sure to select this button BEFORE bringing a Treatment in if you wish to hide the costs on the screen.
Select a Treatment Style and Size
With the cursor in the Item Name field, click the Search ![]() button in the lower left of the window to display the Treatment Search window.
button in the lower left of the window to display the Treatment Search window.
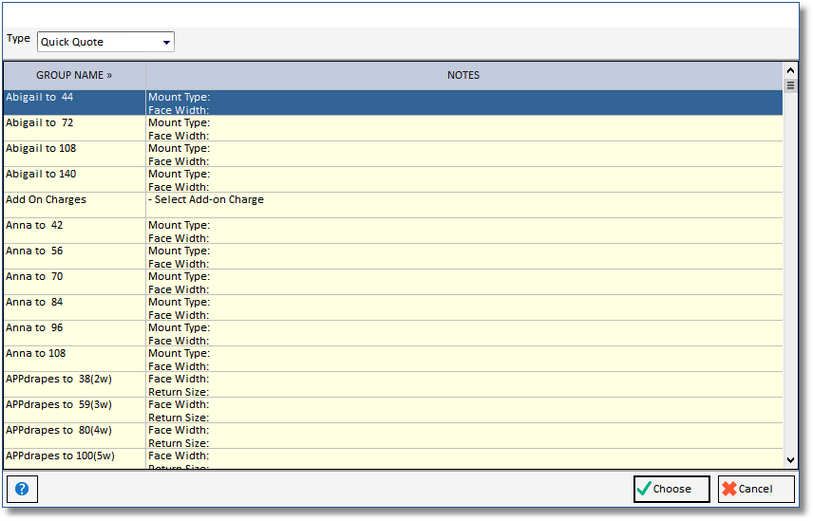
The Treatment Search Window can be used to locate the desired treatment in the usual Design Manager manner by typing the first few characters of the Group Name of the treatment you wish to find. The Quick Quote User Guide you received upon purchasing Quick Quote for Design Manager contains a “key in code” for all programmed treatments. By entering the first few characters of the "key in code" into the Item Name field before clicking the Search button will cause the Treatment Search Window position itself to the treatment most closely matching the "key in code" and will list all of the available sizes for the treatment. Once you have selected the correct treatment, click the Choose button on the Treatment Search Window and a list of all the Components needed to make the treatment will be displayed in the Treatment Tree.
Input Treatment Information
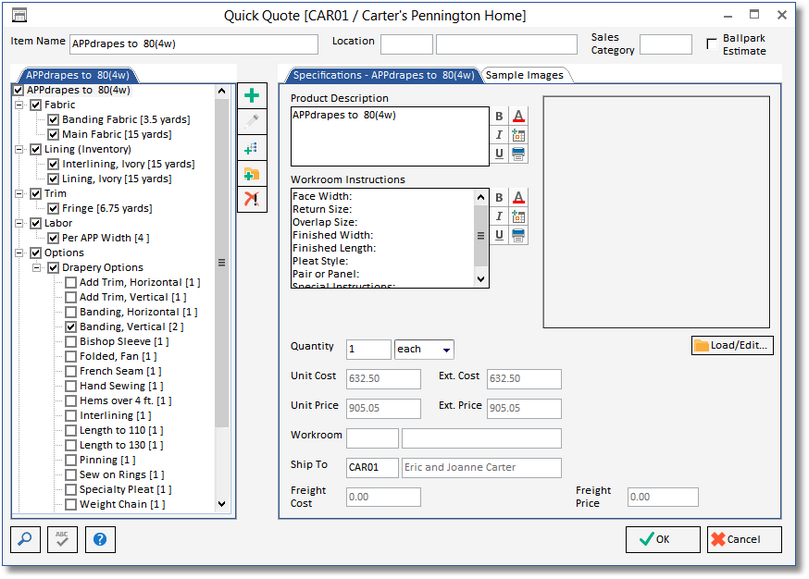
Upon choosing the desired treatment, the Treatment Tree will be populated with default fabrics, labor, options, etc. for the treatment and other information will automatically be displayed:
| • | The Item Name will be entered into the Product Description. As the Product Description of the treatment itself will be on the Proposal (Quote) and Invoice to the Client, it is good practice to change this information to something more descriptive and understandable for clarity. |
| • | The Workroom Instructions will display a fixed template of questions that should be answered to properly communicate all the necessary information for the workroom to complete the treatment. The template varies as necessary for each type of treatment. Only the workroom will see what is entered into the Workroom Instructions so you can safely mention labor and material costs, catalog numbers, and other sensitive information, if necessary. |
| • | The overall Unit and Extended Costs and Prices, along with the Freight Cost and Price, will also be displayed. These cannot be manually changed for the overall treatment on the Quick Quote Window as they are calculated from the sum of the treatments individual Components. |
| • | The Quantity will always default to 1. Changing the Quantity to the desired number of pieces will corresponding update the Extended Cost and Price. |
Now, input the proper Vendor Code that will be constructing the treatment into the Workroom field. The Ship To Code should also be entered to indicate where the final product will be shipped by the workroom. A Location and Sales Category Code can also be optionally entered. If you had highlighted a Location within a Project on the Projects and Specifications Window prior to clicking the Quick Quote button, the Location Code will default to your highlighted selection.
Adding Pictures to the Treatment
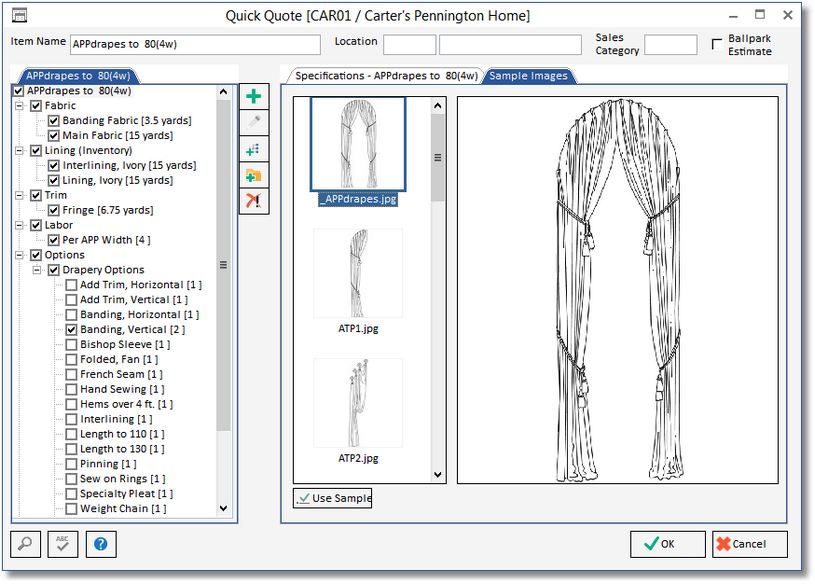
Quick Quote for Design Manager allows you to associate pictures for both the treatment itself and each of the individual Components. Sample Images from the Quick Quote program are available. Select the Sample Images tab to display the different Quick Quote custom drawings of the treatment. Select the picture you wish to use by clicking on it, then click on the Use Sample ![]() button to load that picture for the Item.
button to load that picture for the Item.
If you would like to import your own picture for the treatment, click the Load/Edit ![]() button which will display the Load Picture window.
button which will display the Load Picture window.

From here, you can load a picture from your computer or network such as a custom DreamDraper image, scan a picture from a TWAIN-compliant scanner, or even copy a picture from your Clipboard. The treatment picture will be displayed in the header of the Work Order document and optionally on the Proposal (Quote) and Invoice to the client.
Learn more about the Picture and Image Functions available.
Validate Treatment Options and Yardage
Each treatment group has a set of “Programmed Treatment Features” that is displayed in the Treatment Tree upon selecting the desired treatment. Refer to this for the treatment you have selected in the Quick Quote workbook. It provides the size ranges on which the yardage calculations you now see on the Treatment Tree are based. If your treatment falls into the size ranges, and you are using a solid fabric or a fabric with a 27” repeat, you can use the calculations provided. If your measurements exceed the sizes indicated, first check the Options branch of the Treatment Tree to see if additional length or width charges are already applied. These options will indicate if additional yardage will be needed. If so, be sure to add this yardage manually to the appropriate components such as main fabric, contrast fabric, trim, etc. If your fabric has a larger repeat, refer to the Quick Quote workbook to calculate yardage included in the treatments sections of this workbook. Yardage calculations can be changed on an individual quote without changing the stored information.
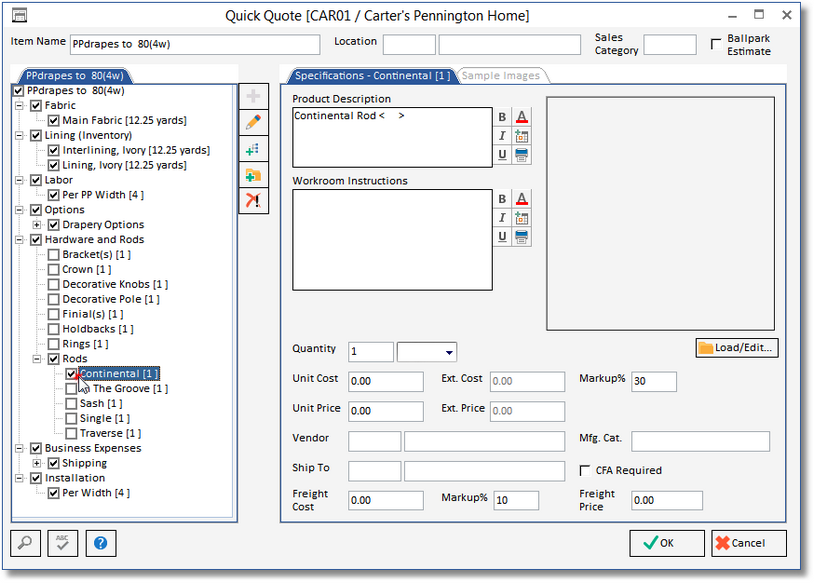
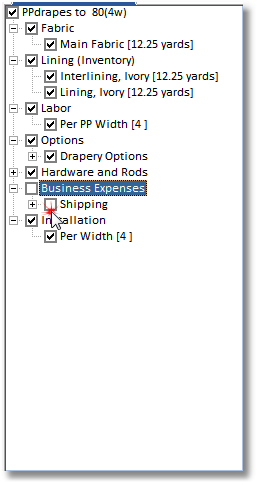
The Programmed Treatment Features also prevents you from inadvertently overlooking a necessary Component for the treatment. Quick Quote may have a particular category checked (such as Drapery Options) but with none of the specific selections under that category checked in the Treatment Tree. This indicates that, in most cases, you would need to check one of the selections under this option to complete the treatment. In fact, upon clicking the OK ![]() button to create the treatment in the Project, a warning will be displayed for each such category, forcing you to uncheck the category heading or make a selection under the category. For example, in PPdrapes to 80 (4w) shown below, the Hardware and Rods category is checked but none of the selections (Brackets, Decorative Knobs, any of the Rods, etc.) are checked. If you click OK to create the treatment, you will be asked to either uncheck the Hardware and Rods heading or check at least one of the selections under Hardware and Rods.
button to create the treatment in the Project, a warning will be displayed for each such category, forcing you to uncheck the category heading or make a selection under the category. For example, in PPdrapes to 80 (4w) shown below, the Hardware and Rods category is checked but none of the selections (Brackets, Decorative Knobs, any of the Rods, etc.) are checked. If you click OK to create the treatment, you will be asked to either uncheck the Hardware and Rods heading or check at least one of the selections under Hardware and Rods.
Adding or Removing Components on the Treatment
Each treatment can be completely customized per quote so in many cases additional Components will need to be added or a Component from the Programmed Treatment Features will need to be removed. To remove a Component, simply uncheck the selection you wish to remove. You may also need to uncheck the category heading as well if no selections under the heading are being used. In the example below, we are removing Shipping from the treatment so both Shipping and the Business Expenses headings would need to be unchecked to fully remove the Shipping component.
You can also use the Delete ![]() button to remove a selection or even an entire category heading for unwanted Components. To do so, simply select the Component or category heading and click the Delete button. The benefit of using the “X” button rather than unchecking selections is to minimize unwanted information on the Treatment Tree.
button to remove a selection or even an entire category heading for unwanted Components. To do so, simply select the Component or category heading and click the Delete button. The benefit of using the “X” button rather than unchecking selections is to minimize unwanted information on the Treatment Tree.
To add a Component, if it is already displayed on the Treatment Tree, simply check it. If the Component is not listed, you can add it manually by clicking the Add ![]() button to the right of the Treatment Tree.
button to the right of the Treatment Tree.
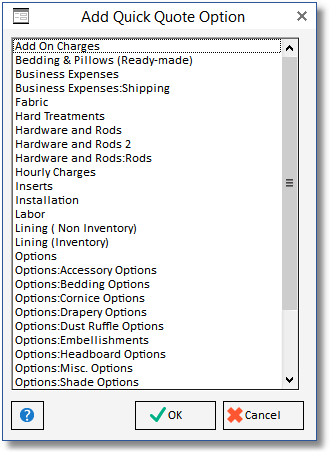
To add the Component, select either the treatment heading itself or the particular category heading. If you select the treatment itself and click ![]() , all available components will be displayed on the Add Quick Quote Option window.
, all available components will be displayed on the Add Quick Quote Option window.
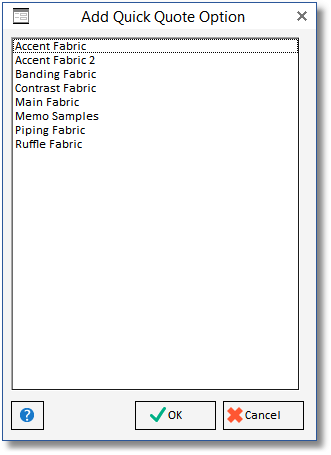
Clicking ![]() with a category heading selected will show only the selections that pertain to the heading. The Fabric selections are shown below. Click on the desired selection on the Add Quick Quote Option window to load the desired component into the treatment.
with a category heading selected will show only the selections that pertain to the heading. The Fabric selections are shown below. Click on the desired selection on the Add Quick Quote Option window to load the desired component into the treatment.
Remember, making changes to a treatment will not permanently alter the “master” treatment. You are only affecting the treatment for the particular quote.
Input Component Information
After the treatment has all the necessary Components, the information for each individual Component can be modified. To review and edit a particular Component, select it on the Treatment Tree.
The Product Description for the Component only appears on the Purchase Order to the Vendor from which the merchandise will be ordered. For fabric and trim, you’ll see the < > symbol which indicates that the pattern name and number for the material need to be entered. You can optionally add Workroom Instructions for the Component itself that will be displayed only on the Work Order to communicate any necessary information to the workroom. Input the Unit Cost from the Vendor which will automatically calculate the Extended Cost, Unit Price, and Extended Price. The Markup % defaults from the Project settings but can be overridden to calculate the desired price to the client. Similar to the Component Window - Component Tab, you can also enter a fixed Extended Price as well which would update the Markup % appropriately. Next, input the Vendor Code from the Vendor which the component will be ordered. Enter the Ship To Code of the workroom (or other shipping location) to where the Component will initially be delivered into the Ship To field. You can also input the Vendor’s catalog number for the Component into the Manufacturer’s Catalog Number (Mfg. Cat.) field which will also appear on the Purchase Order for the Vendor. If necessary, Freight Cost, Markup %, and Price can be added for
Components that are incurring shipping charges. A picture for the Component, such as fabric swatch, can be added by clicking the Load/Edit button and will appear on both the Purchase Order and Work Order for the component. Most of these fields (Vendor, Ship To, etc.) are optional as they can be entered on the Component Window at a later time.