If your company has showroom or warehouse inventory, you may want to use merchandise from this inventory when entering items and components for a project. The component window is used to control to whether merchandise comes from inventory or whether a purchase order is to be issued for it.
There are 2 methods to get inventory into project specifications depending on whether the inventory item is to be a separate item itself or if it is top be one of many components. If it is to be an item by itself such as an antique, click the Inventory button on the main specifications grid.
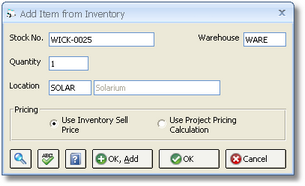
You will be asked to enter the stock number, location and quantity. Click on OK and the item will be set up in the project specifications.
If the inventory item is one component of many making up an item you must first enter the item into your project as described earlier. Make sure that the item description shows the wording that you would like the client to see. Next, click the Add button to the right of the purchase order components. You will now see the Component window.
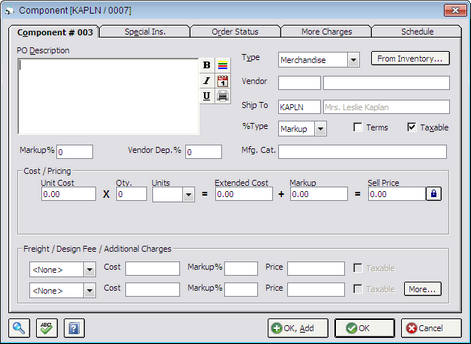
If you were ordering this merchandise from a vendor, you would simply fill out this window with the appropriate information. But, since we are taking the merchandise from inventory, you may click on the From Inventory button in the upper right of the Component window. The computer will show you a list of inventory to choose from. Highlight the merchandise you would like to use and click the Choose button at the bottom of the window. The computer will return to the Component window with your chosen merchandise displayed. The computer will bring over from inventory the cost and the sell price information, as well as the description and other information. The computer will NOT know what quantity you would like to use, so be sure to fill in the quantity in the Cost/Pricing area of the Component window. You may also change any of the pricing figures if you would like to charge an amount other than what is indicated in the inventory record.
After your inventory component is selected, you will notice that the From Inventory button now reads Remove Inv. This button is now used if you change your mind and no longer want to use the merchandise from inventory. Click this button and the merchandise will be returned to inventory. Note, however, that the description, vendor, and other information will remain on the window. This feature keeps you from having to re-type the information to create a purchase order for this project if you are now planning to order the merchandise. To remove the component information completely you must delete the component using the Delete button on the item window. If this is the only component in the item, then you will delete the item itself because every item must contain at least one component. It is not necessary to use the Remove Inv button if you are planning to delete the component. Deleting the component automatically places the merchandise back into inventory by removing the commitment.