It is important to keep your Checkbook records in agreement with those of the bank. Balancing your checkbook, or reconciling cash, is important because errors can sometimes be made by your bank or yourself upon recording cash transactions. For this reason, it is strongly recommended that you reconcile cash each month.
To reconcile cash you will need your most recent bank statement. Select A/P è Checking (Print Checks, Checkbook, Credit Cards, Reconcile) and then click on the Reconcile Cash Tab.

The first step is to identify the Checking Account you wish to reconcile. Select the desired Checking Account on the Account menu. Next, enter the date of the bank statement in the Bank Statement Ending Date field. The date will be shown on the statement itself. Click the Start à button and Design Manager will display the Check and Deposit information for this Account.
Clearing Checks:
The Checks Grid contains all of the Checks that you have written that were dated on or before your statement date. Checks that have been reconciled in an earlier month will not be shown. The bank will have indicated which Checks it has processed when you receive the bank statement. Find each of these Checks in the Checks Grid and click the Clear (Clr) column to indicate that the bank has reported that Check as cleared or processed.
Clearing Deposits:
The bank statement will similarly list the Deposits you have made. Find the Deposits on the Deposits Grid and mark as cleared each of the Deposits on the bank statement.
As individually clearing Checks and Deposits may be tedious when numerous entries are involved, it may be found useful to use the Clear Checks and Deposits Window by clicking the Clear... button to quickly mark entries cleared based on a variety of criteria.
If the majority of your Checks and Deposits clear in a banking period, you can use the Clear All button mark all entries on both the Checks and Deposits Grids as cleared. Then simply unclear the entries NOT on your bank statement. This process may be faster then clearing each Check and Deposit manually!
Service Charges:
You may also have received service charges from the bank. They will also be listed on the bank statement. To enter these charges you should click the Edit Service Charges (Edit SrvChg) à button to the left of the Service Charges field. The Service/Finance Charges Window will appear.

Click the Add button to the right of the Service Charges Grid to display the Service/Finance Charges Distribution Window on which you may enter the dollar amount of the service charge as well as the General Ledger Expense Account to which it should be recorded. As you enter these charges the total amount will be updated in the Total Service/Finance Charges field. When you have entered all of the charges, this number should agree with the dollar amount of service charges on your bank statement. Click OK on the Service/Finance Charges Window and you should see the service charge amount appear in the Service Charges field on the Reconcile Cash Tab. The check entry on the Checks Grid for the service charge will also be marked as cleared.
Your bank statement may include a total for the checks and service charges and a total for the deposits and interest that it is reporting. If so, you can check your work by comparing the total for the Checks in the Total Cleared Checks field. The number of cleared Checks will precede the Total Cleared Checks field. You should also compare the total for the deposits to the Total Cleared Deposits field. Again, the number of cleared Deposits will precede the Total Cleared Deposits field. If the totals in Design Manager do not match the totals shown on the bank statement, then one of the following problems may have occurred:
| 1. | You may have neglected to click the Clear column for one of the Checks or Deposits shown on the statement. In the same vein, it is also possible that you accidentally cleared a Check or Deposit that was NOT listed on your statement. If so, you can remove the check mark from the Clear column by clicking it again. |
| 2. | You have a Check or a Deposit with an amount that differs from the amount that the bank is reporting. Look at each Check and Deposit that you have cleared and make sure that its amount matches that shown on the bank statement. If you find a difference, you can correct it in Design Manager if the transaction has been entered erroneously or else you will need to contact your banking institution if they are in error. |
| 3. | You failed to enter a Check or Deposit at all. |
| 4. | You entered the wrong Bank Statement Ending Date. |
When your Total Cleared Deposits, Total Cleared Checks, and Service Charges all agree with your bank statement, you are ready for the final step. Click the Reconcile button in the lower right corner of the Reconcile Cash Tab. The Reconcile Cash Window will appear.
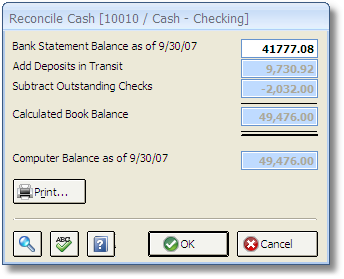
Enter the ending balance from your bank statement into the Bank Statement Balance as of <Ending Date> field. The ending balance should be taken from the statement itself. After entering the number, press the Tab key to indicate that you are finished typing. Design Manager will then deduce the Calculated Book Balance by adding any outstanding deposits and subtracting outstanding checks to indicate the amount that should be in your Checking Account according to the bank. The Calculated Book Balance will be compared to the current balance of the Checking Account in Design Manager in the Computer Balance field. Any difference will be shown in the Difference field at the bottom of the window.
If everything is in agreement, it is recommended to click the Print button to print a copy of the reconciliation for your records. Then you can click the OK button at the bottom of the window to indicate that the reconciliation is complete and correct.
If the difference is not zero, you will need to re-examine your work, so press Cancel to exit the Reconcile Cash Window. If all of the common reconciliation issues above have been examined, be sure that you are entering the proper ending balance from your statement!