The Generated Work Order(s) Window is accessed from the New Work Order(s) Window. When you are ready to print the Work Orders from the selected Components on the New Work Order(s) Window, click the OK button to show the Generated Work
Order(s) Window. The Work Orders produced from the tagged Components will appear on the Work Orders Grid with one row per Work Order. If the information appears to be correct, you may click on the OK button to print the Work Orders.
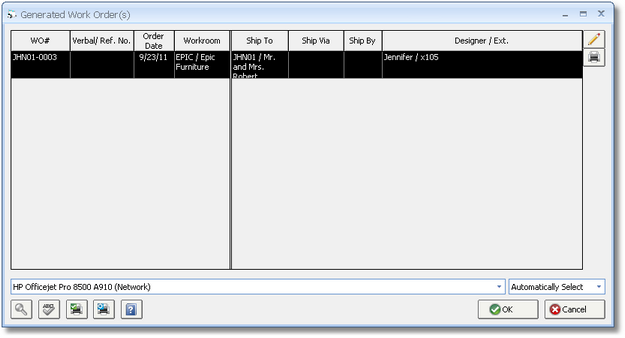
Edit: Clicking on the Edit button to the right of the Work Orders Grid will open the Edit Generated WO Window where you can change the Ship Via, Ship On or Before Date, and Designer and Phone Extension fields. You can also record a reference number if the order was made via the telephone or other medium.
Work Order List (WO List): Clicking on the Work Order List button to the right of the Work Orders Grid will allow you to print a consolidated listing of the Work Orders and of the Components included upon them for your reference. This document is also referred to a Proforma Work Order often used for approval from a purchasing manager or owner.
Work Orders Grid: This grid displays the Work Orders creating by consolidating the Components from the New Work Order(s) Window by Item. The majority of the information on this grid can be changed by selecting the desired Work Order and clicking the Edit button. The columns on this grid are explained below:
Work Order Number (WO #): The unique Work Order Number for the document.
Order Date: The date which will be displayed on the Work Order.
Workroom: The Vendor Code and Name of the Workroom from which you are placing the order.
Ship To: The Ship-To Code and Name to where the finished product will be shipped from the Workroom.
Vendor: The Vendor Code and Name of from which you are ordering the merchandise.
For a description of the other columns on the Work Orders Grid, see the Edit Generated WO Window as the information is often reviewed and edited on that window.
Printing Work Orders: Click on the OK button to print the Work Order(s). Make sure that you have the printer selection on the Printer Button Bar set to the desired printer. For more information on printing options, see Printer Button Bar. Whether printing the Work Order(s) to the monitor or directly to the printer, you will need to either accept or reject the Work Order(s) after printing and reviewing them.
Accepting and Rejecting Work Orders: After printing the Work Order(s), Design Manager will ask "Would you like to accept or reject this Work Order?". Be sure to examine the Work Order(s) carefully before accepting. If you find any errors on the Work Order(s), click the Reject button and correct the errors before printing the Work Order(s) again. Components will be ordered as of the date on the Work Order after the Work Order is accepted.