The second tab on the Project Window is the Site / Ship To Tab. As the Site Address is often the same as the Billing Address, Design Manager will automatically fill in the Site Address with the Billing Address information you entered on the Project Tab. There are circumstances, however, where the Billing Address differs from the Site Address. For example, if a Client lives full time in New York and wants to be billed there, then the Billing Address would be his or her New York address. However, if the Project for this Client were a summer home in Florida, then the Site Address would be his or her Florida address.
The Ship To Address is the default address to where Vendors will deliver merchandise. Each Component for this Project will initial be assigned this Ship To Code, but can have the code changed as necessary. If the Shipping Address is the same as the Site Address, you may click on the Create From Site button. You may also simply click the OK button to save the new Project and Design Manager will ask you if you want to create a Ship To Code with the same code as the Project, and the same address as the Site Address. To edit the Shipping Address, place the cursor in the Ship To Code field and click on the Search button. This will open the Ship To Code Search Window where you may select a Ship To Code, create a new one, or edit a shipping address.
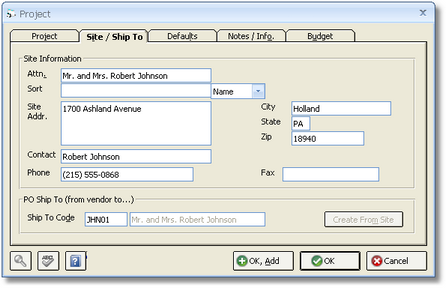
Site Information:
Attention: Enter the attention name that you would like to appear above the Site Address for a Project on Proposals and Invoices. This could be the Client's name or another individual.
Sort: The Sort selection allows you to decide the alphabetical "order" in which you want to display the attention name on certain reports and documents. "Company" will display the name exactly as it appears in the Attention field. For instance, if the attention name is "Mr. John Smith", the Company selection will display the name exactly as "Mr. John Smith". When "Name" is selected, Design Manager will attempt to reconfigure the name with the surname of the individual before the first name. In this case, if the attention name is "Mr. John Smith", the name will be displayed as "Smith, John (Mr.)". "Manual" allows to configure the sort order of the attention name in any manner you wish.
Site Address: Enter the Project Site Address here. The Site Address allows you to define an alternate address for a Project site as opposed to the Billing Address. The Site Address can optionally print on Proposals and Invoices for the Project. Fill in the City, State, and Zip code information as needed.
Contact: Enter a separate contact name to use when calling the Project site.
Phone: Enter the phone number for the Project site.
Fax: Enter the fax number for the Project site.
Ship To Information:
Ship To Code: The Ship To Code is used to designate the default address where Vendors will ship goods for a Project. To define a new code or choose an existing one, click on the Search button in the lower left corner of this window while the cursor is in this field. The Ship To Code entered here may be the same as a Project’s site address. For each Item ordered from a Vendor, the Item will be assigned this Ship To Code by default. You may then change the Ship To Code to an alternate address for special Items that need to be shipped elsewhere.
Create From Site Button: If the Ship To Address is the same as the Site Address for a Project, you may click on this button. Design Manager will automatically create a Ship To Code, and make the address the same as the Site Address.