The Update Items Window is accessed by clicking on the Update Items Button on the Project Window – Defaults Tab. Here you can selectively apply the current Project defaults to multiple Items within the Project.
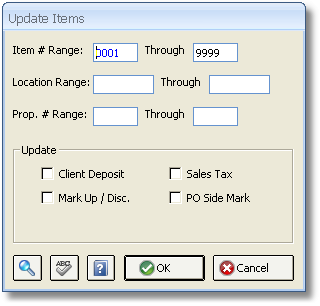
This window allows you to enter a range of Item reference numbers, Locations, or Proposal numbers for which the new Project defaults will apply. Select the defaults you wish to apply within the Update frame. Click the OK Button to apply the defaults. Design Manager will always warn you that multiple Items will be affected by the update.
Item # Range: You can apply the desired Project defaults to Items in the following manners:
| • | All the Items within the Project by leaving the Item # Range set to "0001" to "9999" |
| • | A set of Items by inputting the desired range, as in "0001" to "0015" |
| • | A single Item by entering in the reference number in both ranges such as "0001" to "0001". |
Location Range: You can apply the desired Project defaults to all Items in a particular Location or range of Locations within the Project. For example, you can update all the Items within the "Living Room" by setting the Location Range to "LVGRM" to "LVGRM" where "LVGRM" is the Location code. Leaving the Location Range blank will apply the defaults to Items regardless of their Location code.
Proposal Range: You can apply the desired Project defaults to all Items included on a particular Proposal or range of Proposals. For example, you can update all the Items included on Proposal #0001 by setting the Proposal Range to "0001" to "0001". Leaving the Proposal Range blank will apply the defaults to Items regardless of their Proposal number(s).
Update:
The update options let you choose which defaults to apply. Note: Please be aware that this option can radically change all Items in your project. There is no mechanism to undo the changes once the update had been run.
Leaving all of the options un-checked is also a viable setting. For example if you change the definition of the status codes, you can run an update on all items in order for the status to be immediately re-evaluated for each existing item in the project. See “Company Information Window, Item Status Tab.”
Client Deposit: Selecting the Client Deposit option will set the Item deposit percentage to the current value on the Project Window - Defaults Tab AND the Include in Deposit options for each Component Type on the Project Advanced Options Window - General Tab and recalculate the deposit amount accordingly. Further, this option will also recalculate the deposit amount based upon the current setting of the Include Sales Tax in Deposit option.
Sales Tax: The Sales Tax option will update the taxable setting for each Component Type to the current values on the Project Advanced Options Window - General Tab AND will include any changes to the Tax Percentages on the Sales Tax Calculation Window for the Project's assigned Sales Tax Code. The Item sales tax will be recalculated accordingly. Note: Please be aware that this option can radically change the sales tax for all Items being updated! There is no mechanism to undo the changes once the update had been run!
Markup/Discount: The Mark-Up/Discount option will update the Markup/Discount/Fee percentage and Percentage Type (i.e., Markup, Discount, or Fee) to the current values on the Project Advanced Options Window - General Tab and recalculate the sell price on the Component Window accordingly. Note: Please be aware that this option can radically change the sell price for all Items being updated! There is no mechanism to undo the changes once the update had been run!
PO Sidemark: Selecting the PO Side Mark option will set the Component side mark to value of the Project PO side mark on the Project Window - Defaults Tab. This option will also apply the setting of the Append Location to Side Mark setting on the Project Window - Defaults Tab. Note: This option will overwrite the side mark for all selected Components!