Collecting Data / Scanning and Entering Items
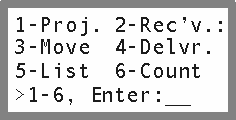
The scanner’s main menu has options that correspond to the drop-down choice on the Item / Scanning Window within Design Manager (see the section entitled "Using the Computer Software"). Each option is used to scan and upload that type of item. The List option (#5) can also be used to add scanned items to a Point of Sale Invoice. Each of the scanning options will be described below:
Project Transfer (Taking Items To and From a Project Site)
Menu option #1 (Proj.) on the scanner is used to scan inventory items to be taken to the client site and eventually loaded into a project for billing. The data collection software will track the list and has options to add scanned items to the list or remove them. This can be thought of as a truck load of items (also called a “lot”). You scan each item onto the list and designate which project they will be going to. Those items are loaded onto a truck and taken to the job site were the designer will use some items and not use others. When the truck returns, the remaining items are scanned for coming off of the list (or truck). These items that are returned on the truck will drop off of the computer’s list and the remaining items (the ones that remained at the job site) can be transferred to the project(s) for billing.
Begin by pressing 1 on the scanner and then the Enter button. Note: When using the HT580 the ESC key functions as the Exit key instead of F4.
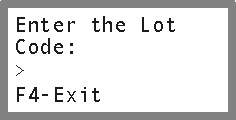
Next, enter the lot code that you assigned using the computer software. This could be your initials, or a truck number, etc. The lot code is used to uniquely identify this group of items. To enter letters, press the Alpha button, to enter numbers again, press the Alpha button again. Be sure to press the red Enter button when you are finished keying the lot code. Shown below is lot code 1AC34.

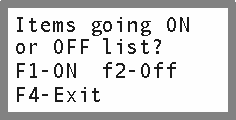
After pressing the Enter key you should see the following message. Designate if items are going on the list (on the truck) or off of the list (returning and being unloaded from the truck). Press 1 (F1) for On, 2 (F2) for Off.
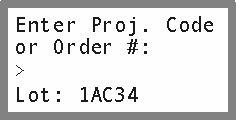
Next, if you chose On List then designate the project code to which you are taking the items to. Each Lot can have items going to multiple projects (see below). If you are taking items Off the list then there is no need to designate a project code.
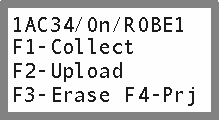
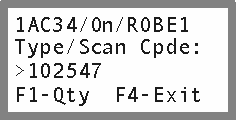
The scanner will present you with a menu that lets you scan/enter new items 1-Collect (F1) or 2-Erase (F3)the current list of items. The top of the screen will show the Lot Number, whether the scanned items are going On or Off of the list, and the current project code (for On list). When items are going On list, there will be an additional choice 3-Proj (F4) that allows you to change the project code. Each item scanned will be associated with the project code at the top of the screen. For example if you enter project code ABC and scan item #1 and #2, then return to the menu by pressing ESC and then press 3 and change the project code to DEF and scan items #2 and #3, then when uploading the scanned items, 1 and 2 will appear under project ABC and 2 and 3 under DEF.
To scan items, press 1 and enter. You may now press the trigger or Scan button to scan a bar code. You may also type in the bar code number (usually printed under the bar code itself). After typing in the number manually you must press enter, when scanning the bar code there is no need to press enter. There are two ways to set the quantity of items scanned. The first is to scan the items over and over. For example, if you have three identical chairs you can simply scan the tag on each chair (or scan one tag three times). When the items are uploaded to the computer, one chair will appear on the list with a quantity of three. The second way is to enter the quantity. This is handy if you have many of a single item. For example, if you are counting lamps and you have 60, you can scan the first lamp and then press F1-Qty or Menu-1 and enter 60. On the HT580 you would press the MENU button and then the 1 button. The quantity function only can be used to change the quantity of last item scanned.
After your items have been scanned, you need to press ESC or (F4) to-exit the scanning screen and return to the collect menu. Here you can specify another project and then scan more items, or you can upload your scanned items to the computer.
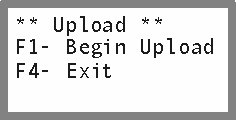
To upload your items using the PT 2000, press F2. To upload the item using the HT580, simply plug it into the computer or base. After putting the scanner into the cradle (docking station), Open Design Manager and go to Inventory - Remote Data Collection.
Add a new Project Transfer Type - enter your Lot up an other Information, then press the Upload button. A Window will appear to allow you pick the type of scanner that you are using. Choose the correct device and press OK. Next, the window appears that states "Do Not Touch the Keyboard or Accessing Device" press the F1-Begin Upload on the PT 2000 scanner (without removing the scanner from the cradle). The scanner will transmit the data across your screen and soon the items should appear on the list. When using the HT580 or CS-1504 the items will be loaded automatically. See the Item/Scanning Window section of this manual for more details.
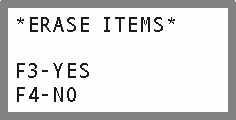
After the items are uploaded, the scanner will ask if you would like to erase the contents of the scanner. If the items uploaded correctly then choose Yes, if the upload did not work correctly choose No and you can try it again.
Receiving / Moving / Delivery / Item List / Physical Count
Your scanner can also be used to receive items on either inventory or project related purchase orders, move stock items between showrooms or warehouses, deliver items to the client site, create a simple list of items, or take a physical count of a warehouse or showroom. Since the operation of the scanner is similar for all of these functions, they will be covered together. For more information on each type, see the Item/Scanning Window section of this manual.
To scan items for one of these functions, choose the function 2 through 6 on the main menu.
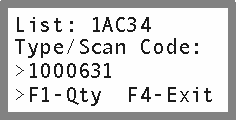
Next, enter the lot code that you assigned using the computer software. This could be your initials, or a truck number, etc. The lot code is used to uniquely identify this group of items. To enter letters, press the Alpha button, to enter numbers again, press the Alpha button again. Shown below lot code 1AC34 has been entered.
To scan items, press F1 or choose 1 and press Enter. You may now press the trigger or Scan button to scan a bar code. You may also type in the bar code number that can be usually found under the bar code itself. After typing in the number manually you must press enter, when scanning the bar code there is no need to press enter.
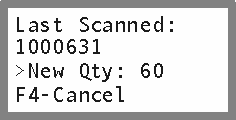
There are two ways to set the quantity of items scanned. The first is to scan the items over and over. For example, if you have three identical chairs you can simply scan the tag on each chair (or scan one tag three times). When the items are uploaded to the computer, one chair will appear on the list with a quantity of three. The second way is to enter the quantity. This is handy if you have many of a single item. For example, if you are counting lamps and you have 60, you can scan the first lamp and then press F1-Qty or Menu-1 and enter 60. On the HT580 you would press the MENU button and then the 1 button. The quantity function only can be used to change the quantity of last item scanned.
After your items have been scanned, you need to press F4-Exit or ESC to exit the scanning screen and return to the collect menu.
To upload your items using the PT2000, press F2. To upload the item using the HT580, simply plug it into the computer or base. After putting the scanner into the cradle (docking station), bring your Lot up onto the computer and press the Upload button. A Window will appear to allow you pick the type of scanner that you are using. Choose the correct device and press OK. Next, the window appears that states "Do Not Touch the Keyboard or Accessing Device" press the F1-Begin Upload on the PT2000 scanner (without removing the scanner from the cradle). The scanner will transmit the data across your screen and soon the items should appear on the list. When using the HT580 or CS-1504 the items will be loaded automatically. See the Item/Scanning Window section of this manual for more details.

After the items are uploaded, the scanner will ask if you would like to erase the contents of the scanner. If you items uploaded correctly then choose Yes, if the upload did not work correctly choose No and you can try it again.