The Client Tab is the first tab on the Client Window. To add a new client, enter a client code and all other required or desired information into the appropriate fields. To edit an entry, type in the new information. To change a client code, you must delete the entire entry and add a new entry. See the Delete function on the Client Glossary Window.
When assigning a client code a new Project, the address, phone, fax, contact, and salesperson/manager information will all default into the respective fields on the Project Window.
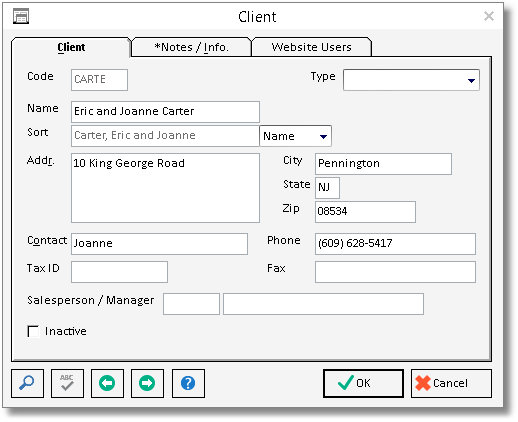
Code: This code is used to designate a particular Client. It must be a unique series of up to five letters or numbers. You may use the first few letters of the client’s last name for the Client code.
Type: Client Codes can be categorized using the Type selection in any manner you see fit. You can add a new Type, "Commercial" for example, simply by entering it into Type field. After doing so, the "Commercial" selection will be available for all new Client Codes.
Name: Type the name of the Client into this field. You can input up to 30 characters.
Sort: The sort selection allows you to decide the alphabetical "order" in which you want to display the Client name on the glossary and certain reports. "Company" will display the name exactly as it appears in the name field. For instance, if the Client name is "Bank of Pennsylvania", the Company selection will display the name exactly as "Bank of Pennsylvania". When "Name" is selected, Design Manager will attempt to reconfigure the name with the surname of the individual before the first name. In this case, if the Client name is "Mr. and Mrs. John Smith", the name will be displayed as "Smith, John (Mr. and Mrs.)". "Manual" allows to configure the sort order of the name in any manner you wish.
Address: Type the address, including city, state and zip code of the Client. This is the address that will default as the billing address of the Client's Project(s).
Contact: This field is for the name of the primary individual with whom you communicate when contacting this Client. The contact name is generally more important for commercial work as the contact name is usually the Client name in residential Projects. Up to 40 characters may be used. Additional contacts, phone numbers, etc. can be entered using the Notes/Information Tab.
Phone: Type the telephone number of the Client into this field.
Fax: Type the fax number, if desired, for the Client into this field.
Tax ID: This field is used to record a Client’s tax ID number. This is an 11-character code used by the government in tracking sales tax information. For example, if the Client was a non-profit organization, you would enter this code so you would not have to charge the client sales tax.
Salesperson/Manager: You may choose to enter the Employee code for the individual who is primarily responsible for Projects for this client. Use the Search Button to locate or add an Employee to the Employee Glossary Window.
Inactive: If a Client has been previously assigned to a Project, but you no longer have a need for the Client, you can mark the Client Inactive. If this option is selected, the Client will not appear in the Client Glossary nor on certain reports. To reopen an Inactive Client, click the Show Inactive option on the Client Glossary Window, edit the Client, and unselect the Inactive option.