Design Manager has two methods for recording preliminary or deposit funds from your Client: Deposits on Proposals or Retainers.
A Retainer should be used when the funds from the Client are not yet dedicated to any particular merchandise. Retainers can be manually utilized when the Client is invoiced. Conversely, when a Deposit on a Proposal is recorded, the funds are allocated to each Item on the Proposal, based upon their requested Deposit Amount, and cannot be used for other Items. In other words, the Deposit "ties" the money directly to the desired Items.
Recording a Retainer:
If you would like to record a Retainer for the Project, as you will with all Cash Receipts, you first go to the Documents and Accounting Window. Select the Project for which you wish to record the Retainer and click the Cash Receipt  button which will display the New Cash Receipt Window.
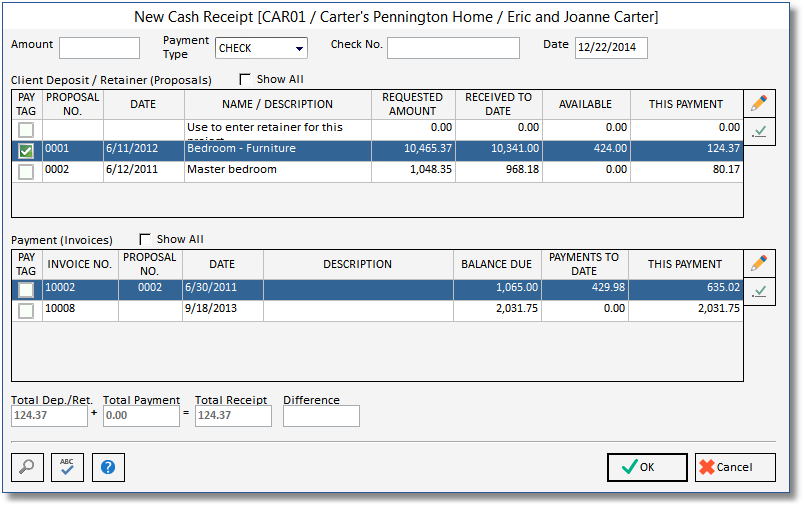
Enter the amount of the Retainer into the Amount field. The Amount field should always contain the total amount received from the Client! Select the appropriate Payment Type and enter the Client's Check Number (Check No.), if desired. If the Payment Type you have selected is not configured using the Requires a deposit to be made (goes to un-deposited funds) option, you can record a Deposit Slip Number (Deposit Slip No.) which will default to the Payment Type Name. For more information, see Recording Receipts into the Un-Deposited Funds Account and Processing Deposit Slips. The Receipt Date defaults to the current date, but can be changed, and represents the date the receipt will appear in the Checkbook. Click the Edit ![]() button to the right of the Client Deposits / Retainers Grid. On the Edit Cash Receipt Payment Window, enter the Amount of the Retainer and, optionally, a Transaction Description. Click the OK
button to the right of the Client Deposits / Retainers Grid. On the Edit Cash Receipt Payment Window, enter the Amount of the Retainer and, optionally, a Transaction Description. Click the OK ![]() button on the Edit Cash Receipt Window to return to the New Cash Receipt Window. "Tag" the Retainer by clicking in the Pay Tag column on the Client Deposits / Retainers Grid. Finally, click OK
button on the Edit Cash Receipt Window to return to the New Cash Receipt Window. "Tag" the Retainer by clicking in the Pay Tag column on the Client Deposits / Retainers Grid. Finally, click OK ![]() to save the new Retainer. After the Retainer has been entered, it will appear directly beneath the Project on the Documents and Accounting window, displaying the Receipt Date, Amount, Client's Check Number, and Transaction Description. An Information Node
to save the new Retainer. After the Retainer has been entered, it will appear directly beneath the Project on the Documents and Accounting window, displaying the Receipt Date, Amount, Client's Check Number, and Transaction Description. An Information Node ![]() for the Retainer will also be displayed, showing the total amount of the Retainer, the portion of the Retainer that has been used on Client Invoices, and the available amount of the Retainer for future Invoices.
for the Retainer will also be displayed, showing the total amount of the Retainer, the portion of the Retainer that has been used on Client Invoices, and the available amount of the Retainer for future Invoices.
Recording a Deposit on a Proposal:
If your Client has accepted a Proposal and sent a Deposit Check for the Items on the Proposal, you will enter the funds as a Deposit against the Proposal. On the Documents and Accounting Window, select the desired Proposal for the Project and click the Cash Receipt button which will display the New Cash Receipt Window.
Enter the amount of the Deposit into the Amount field. The Amount field should always contain the total amount received from the Client! Select the appropriate Payment Type and enter the Client's Check Number (Check No.), if desired. If the Payment Type you have selected is not configured using the Requires a deposit to be made (goes to un-deposited funds) option, you can record a Deposit Slip Number (Deposit Slip No.) which will default to the Payment Type Name. For more information, see Recording Receipts into the Un-Deposited Funds Account and Processing Deposit Slips. The Receipt Date defaults to the current date, but can be changed, and represents the date the receipt will appear in the Checkbook. The Proposal for which you are recorded the Deposit will be highlighted and tagged. If the amount of the Client's check matches the value displayed in the This Payment column, you can simply click the OK ![]() button to record the Deposit. If the amount the Client gave you differs from the amount in the This Payment column, click the Edit
button to record the Deposit. If the amount the Client gave you differs from the amount in the This Payment column, click the Edit ![]() button to the right of the Client Deposits / Retainers Grid. On the Edit Cash Receipt Payment Window, enter the Amount of the Deposit and, optionally, a Transaction Description. Click the OK
button to the right of the Client Deposits / Retainers Grid. On the Edit Cash Receipt Payment Window, enter the Amount of the Deposit and, optionally, a Transaction Description. Click the OK ![]() button on the Edit Cash Receipt Window to return to the New Cash Receipt Window. Finally, click OK
button on the Edit Cash Receipt Window to return to the New Cash Receipt Window. Finally, click OK ![]() to save the new Deposit. After the Deposit has been entered, it will appear directly beneath the Proposal on the Documents and Accounting Window, displaying the Receipt Date, Amount, Client's Check Number, and Transaction Description. The Information Node
to save the new Deposit. After the Deposit has been entered, it will appear directly beneath the Proposal on the Documents and Accounting Window, displaying the Receipt Date, Amount, Client's Check Number, and Transaction Description. The Information Node ![]() for the Proposal will also be updated, showing the Total Requested Deposit amount for the Proposal and the revised Total Actual Deposit Received.
for the Proposal will also be updated, showing the Total Requested Deposit amount for the Proposal and the revised Total Actual Deposit Received.
For a full description of entering Cash Receipts, see Entering Cash Receipts from Clients - Deposits, Retainers, and Payments.
For a Video Tutorial to see how to Enter a Cash receipt for less than the Deposit Requested on a Proposal click on the link below:
http://knowledge.designmanager.com/websitedocs/demos/dm2011/video/CRforlessthanDepReq.html