The first tab on the Project Window is the Project Tab. This is where basic client and Project information is entered, including client contact information.
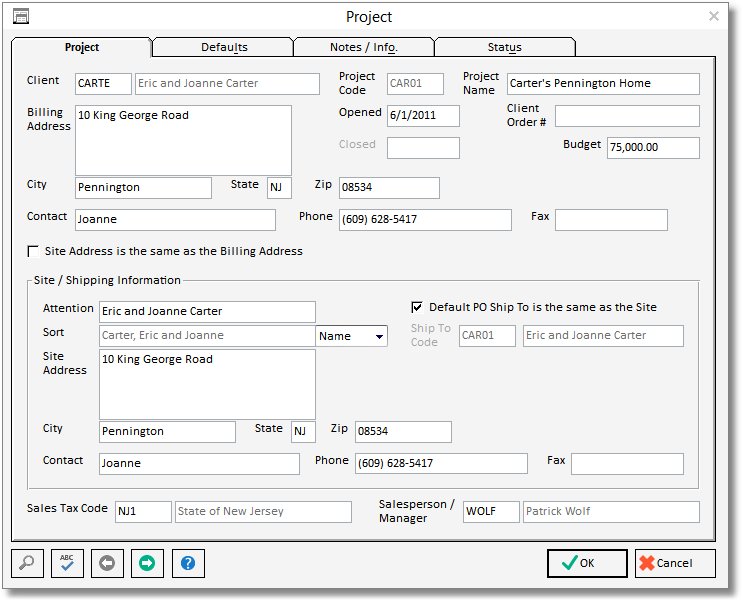
Client: This is the Client Code which represents the client for which the Project has been created. Selecting or inputting a Client Code will default the Client Name, Billing and Site Address, Contact, Phone, Fax, and Salesperson/Manager from the Client Window to facilitate the creation of Project To search for a Client Code, or to create a new client, place the cursor into this field and click on the Search button in the lower left corner of the window. For a detailed explanation of Clients, see the Client Glossary Window.
Project Code: The Project Code is a unique series consisting of up to 5 characters that represents a Project or job in Design Manager. Ideally, the code should be something that can be easily remembered. It is recommended that the first few characters of the client’s last name be used. For example, if you have two Projects for John Smith, the first Project’s Code might be "SMIT1" and the second might be "SMIT2". Once entered, the Project Code cannot be changed - the Project must be deleted and re-entered. Using a purely numeric code such as "00001" is generally not recommended as it becomes difficult to distinguish or remember one code from another!
Project Name: Type the name of the Project into this field. The Project Name should not be confused with the Client Name (see Client above). The Project Name should be descriptive of the Project site or of the design services being provided. For example, if the Client’s name is John Smith, then the Project Name might be "Summer Home – Florida". The name can be up to 40 characters.
Billing Address: The Billing Address, with the City, State, and Zip Code, will be defaulted from the Client Window upon entering or selecting a valid Client Code. The information can then be revised if necessary. The Billing Address should contain the location where you want a Client’s bills to be sent for the Project. This address may be the same as the Project Site Address, but it does not have to be.
Opened: The Opened Date represents the date that a Project was created in Design Manager. When creating a new Project, the Opened Date is defaulted to the current system date but may be changed to any valid date.
Client Order Number (#): The Client Order Number is an optional field used to enter an order number given to you by a Client. If the Client is a hospital or other institution, they may ask you to record their Purchase Order number on any correspondence sent to them. Use this field to record that number as it will print on any Proposals and Invoices for this Project. Again, this field is optional and may be left blank. The Client Order Number can be up to 16 characters.
Budget: The Budget is an optional field for you to enter the Project's overall budget amount. This number will appear on the Budget Report. An amount MUST be entered in this field in order for the Total Project Budget to appear on the report (the report will NOT sum up the Location or Item budget totals).
Closed: If the Project has been closed, the date upon which it was closed will be displayed here.
Contact: The Contact name will be defaulted upon inputting a Client Code and represents the name of the main contact for this Project. If you do not have a contact other than the Client, you may leave this field blank.
Phone: The Phone number will default to the Client Phone number but should be the main phone number for contacting individuals concerning this Project. Additional contacts and phone numbers concerning the Project can be entered on the Notes/Information Tab.
Fax: Enter the Fax number for a Project here. The Fax number will be defaulted from the Client information. If you do not have a fax number, you may leave this field blank.
Site / Shipping Information:
Site Information:
Site is the same as the Billing Address: Selecting this option will disable the Site Address information and indicates that the Billing and Site Addresses are identical. If the Site Address differs from the Billing Address, select this option which will allow you to input the proper Site Address information. As the Site Address is often the same as the Billing Address, Design Manager will automatically selects this option which fills in the Site Address with the Billing Address information. There are circumstances, however, where the Billing Address differs from the Site Address. For example, if a Client lives full time in New York and wants to be billed there, then the Billing Address would be his or her New York address. However, if the Project for this Client were a summer home in Florida, then the Site Address would be his or her Florida address.
Site Address:
Attention: Enter the attention name that you would like to appear above the Site Address for a Project on Proposals and Invoices. This could be the Client's name or another individual.
Sort: The Sort selection allows you to decide the alphabetical "order" in which you want to display the attention name on certain reports and documents. "Company" will display the name exactly as it appears in the Attention field. For instance, if the attention name is "Mr. John Smith", the Company selection will display the name exactly as "Mr. John Smith". When "Name" is selected, Design Manager will attempt to reconfigure the name with the surname of the individual before the first name. In this case, if the attention name is "Mr. John Smith", the name will be displayed as "Smith, John (Mr.)". "Manual" allows to configure the sort order of the attention name in any manner you wish.
Contact: Enter a separate contact name to use when calling the Project site.
Phone: Enter the phone number for the Contact of the Project site.
Fax: Enter the fax number for the Project site.
Ship To Information:
Default PO Ship To is the same as the Site: The Ship To Address is the default address to where Vendors will deliver merchandise. Each Component for this Project will initial be assigned this Ship To Code, but can have the code changed as necessary. If the Shipping Address is the same as the Site Address, select this option and Design Manager will automatically create a Ship To Code with the same Code as the Project Code and the same address as the Site Address. If this option is selected, the Ship To Code field will be disabled.
Ship To Code: If the default shipping location for the Project is somewhere other than the Site Address, be sure that the Default PO Ship To is the same as the Site option is unchecked. Then, you can define a new code or choose an existing one, by clicking on the Search button in the lower left corner of this window while the cursor is in this field. For each Component ordered from a Vendor, the Component will be assigned this Ship To Code by default. You may then change the Ship To Code to an alternate address for special Items that need to be shipped elsewhere.
Sales Tax Code: The Sales Tax Code tells Design Manager how to charge sales tax for Items in a Project. While the cursor is in this field, use the Search button in the lower left corner of this window to search for a Sales Tax Code. If there are no codes on the Sales Tax Code Search Window, then press the Add button below the list to create a new one. You will need to have at least one Sales Tax Code for the state in which you live. For a detailed explanation of Sales Tax Codes, see the Sales Tax Code Glossary Window.
Salesperson / Manager: You may choose to enter the Employee / Manager / Salesperson Code for individual who is primarily responsible for this Project. The Employee Code from the Client Window will be defaulted upon selecting a Client Code. However, you can use the Search button to locate or add an Employee to the Employee / Manager / Salesperson Glossary Window or to select a different Employee.