Design Manager allows a user to import a corporate logo into the software and display the image on Proposals, Client Invoices, Purchase and Work Orders, and Client Statements.
The logo will appear in the top left corner of all the specified Residential/Commercial and Classic Style documents.
When the Modern Style is chosen the logo will be centered on the document.
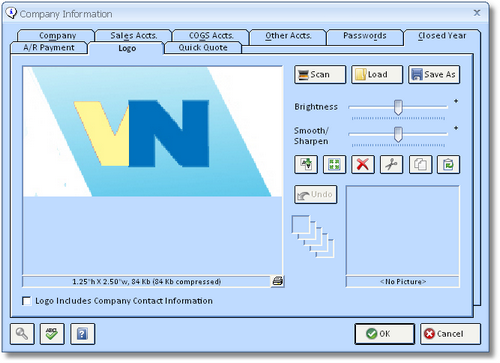
The logo can be imported into Design Manager on the Logo Tab of the Company Information Window.
***In order for the Logo to appear on your Documents, you MUST be sure that you do NOT have the Letterhead (Lttrhd.) Option checked under the Company Information - Advanced - Print Tab.***
Optimal Logo file sizes:
For best results, the Company Logo file that you load into Design Manager should be about a 100KB JPEG or less. The software will not accept a logo if it exceeds 2MB. The reason that the logo file size needs to be small is for printing purposes. The bigger the file size of your Company Logo, the longer it will take Design Manager to print your documents where the logo is included, so to have normal printing speeds please remember to keep the logo image file as small as possible but to still support the required resolution for your printer.
The functions of the controls on the Logo tab are the described below:
Logo Includes Company Contact Information: Select this option if the company logo has the company address, phone numbers, etc. embedded in the logo file. Design Manager cannot selectively display portions of the contact information (i.e., show the company website but not the company address) so be sure the logo file has all the necessary contact information before selecting this option. If all the desired information is not contained in the logo, it is suggested that the logo, itself, be edited to remove any contact information and to not select this option, allowing Design Manager to display the contact information immediately to the right of the logo. The Logo Includes Company Contact Information also determines the size of the logo that will be displayed on the documents.
| • | Residential/Commercial and Classic Style documents: When Logo Includes Company Contact Information is selected, the logo will appear up to 3" x 3" or as large as the original dimensions of the file if it is smaller than 3" x 3". The logo will be 1.5" x 1.5" when the option Logo Includes Company Contact Information is NOT selected. |
| • | Modern Style Documents: When Logo Includes Company Contact Information is selected, the logo will appear up to 8" x 3" or as large as the original dimensions of the file if it is smaller than 8" x 3". The logo will be 8" x 1.5" when the option Logo Includes Company Contact Information is NOT selected. |
Scan Button: ![]() If you have a TWAIN-compatible scanner attached to your computer, you can scan an image directly into the Picture tab by clicking this button. Upon clicking Scan, you will be able to select the appropriate scanner from the Select Source Window.
If you have a TWAIN-compatible scanner attached to your computer, you can scan an image directly into the Picture tab by clicking this button. Upon clicking Scan, you will be able to select the appropriate scanner from the Select Source Window.
Load: ![]() You can import an existing image on your hard drive or network into the Picture Tab by clicking the Load button. Doing so displays the Design Manager - Load Picture Window from which you can locate and select the image from your computer/network that you would like to assign to the Item.
You can import an existing image on your hard drive or network into the Picture Tab by clicking the Load button. Doing so displays the Design Manager - Load Picture Window from which you can locate and select the image from your computer/network that you would like to assign to the Item.
Save As: ![]() The Save As button allows you to store the Item's picture in a variety of formats on your hard drive, network, or removable media.
The Save As button allows you to store the Item's picture in a variety of formats on your hard drive, network, or removable media.
Picture Effects: Several controls are available for customizing the image. As these features alter the image, you'll notice that the original format will be stored in the Picture History in the right-hand corner of the window.
Brightness Bar: Clicking and "dragging" the Brightness bar to the left will reduce the overall image brightness. Conversely, dragging the Brightness Bar to the right will increase the overall brightness.
Smooth/Sharpen (S/S) Bar: Clicking and "dragging" the S/S bar to the left will reduce the sharpness of the image. Conversely, dragging the S/S Bar to the right will enhance the sharpness of the image.
Flip Button: ![]() Clicking the Flip button with vertically invert the image.
Clicking the Flip button with vertically invert the image.
Size Button: ![]() The Size button will launch the Resize Picture Window which allows you to set the dimensions of the image. When using the Logo Includes Company Contact Information option and the company logo file exceeds 3" x 3", you can use the Size button to reduce the company logo in order to reduce the overall size of the page header on the documents, thereby allowing more information to be displayed in the body.
The Size button will launch the Resize Picture Window which allows you to set the dimensions of the image. When using the Logo Includes Company Contact Information option and the company logo file exceeds 3" x 3", you can use the Size button to reduce the company logo in order to reduce the overall size of the page header on the documents, thereby allowing more information to be displayed in the body.
Remove Button: ![]() The Remove button will delete the associated image from the Item. Note that the using the Remove button will NOT delete the original image if it was loaded into the Item from your hard drive or network location.
The Remove button will delete the associated image from the Item. Note that the using the Remove button will NOT delete the original image if it was loaded into the Item from your hard drive or network location.
Cut Button: ![]() Choosing the Cut button removes the image. The image is placed in the history below and on your Computer's Clipboard.
Choosing the Cut button removes the image. The image is placed in the history below and on your Computer's Clipboard.
Copy Button: ![]() The Copy button allows you to keep the image in place and copies the Image into the memory of your Computer's Clipboard.
The Copy button allows you to keep the image in place and copies the Image into the memory of your Computer's Clipboard.
Paste Button: ![]() Clicking on the Paste button will bring in any image you have placed on your Computer's Clipboard; Making it easier to bring in a picture that you do not have saved to the computer.
Clicking on the Paste button will bring in any image you have placed on your Computer's Clipboard; Making it easier to bring in a picture that you do not have saved to the computer.
Undo Button: ![]() Clicking the Undo button will replace the current image with the most recent image in the Picture History. The Picture History is only available while currently adding or editing the image. Upon saving or canceling the Item, the History is lost.
Clicking the Undo button will replace the current image with the most recent image in the Picture History. The Picture History is only available while currently adding or editing the image. Upon saving or canceling the Item, the History is lost.
Print Button: ![]() The Print button is located at the far bottom right of the Picture. When you click on this button a Print Picture window will appear. Choose OK to get a print preview. This option gives you the ability to print the Picture of your Logo and the Company Name. The picture prints at approximately 3" x 3". See Example below:
The Print button is located at the far bottom right of the Picture. When you click on this button a Print Picture window will appear. Choose OK to get a print preview. This option gives you the ability to print the Picture of your Logo and the Company Name. The picture prints at approximately 3" x 3". See Example below: