The first tab on the Checking Window is the Pay Bills / Print Checks Tab. Here checks can be printed for Vendor Invoices and Deposits that have not yet been paid or that have been partially paid. The Pay / Print Tab lists such Payables on the Open Payables Grid.
To select a Payable for payment, tag the entry by clicking the Tag column for the Payable. To print a Check, click on the Checks button in the lower right corner of the window. Doing so will open the Check Run Window where Checks can be printed. If the Pay Now button was used when recording the Payable, it will not appear on this tab. If you have decided to pay the Payable with a hand-written check, debit card, or wire transfer, tag the Payable, click the Hand Check / Wire / Debit button below the Open Payables Grid, and enter the appropriate information on the Invoice Payment Window. if you have decided to use a credit card for payment, tag the appropriate Payables and click the Credit Card button to use the Select Payment Account Window to input the proper credit card information. Finally, if you have recorded payment for the Payable using an on-line banking application, tag the desired Payables and click the Pay On-line button to input the checking account information on the Select Payment Account Window.
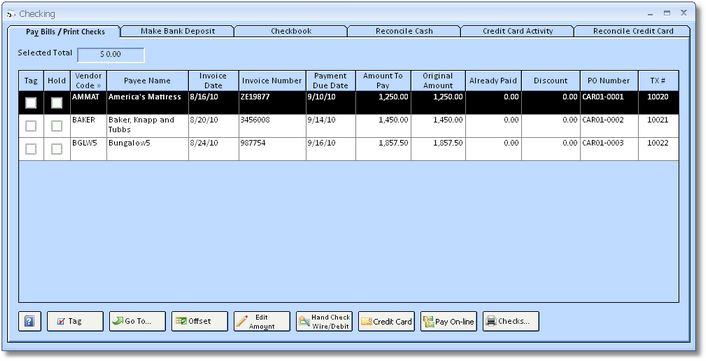
Selected Total: The Selected Total is the current total amount of all Payables tagged for payment.
Tag: Clicking this button will open the Tag Invoices To Pay Window. Here payables can be selected for payment by their Payment Due Date. All payables with a Payment Due Date on or before the date that entered on the Tag Invoices to Pay Window will be tagged for payment.
Open Payables Grid: The Open Payables Grid displays information for all Payables that have not yet been paid or that have been partially paid. Entries appear in Vendor Code order but can be sorted by any column by clicking the desired column heading. Once a Payable has been paid in full, it will be removed from the Open Payables Grid. The columns on the grid are described below:
| • | Tag: Check this column to select a Payable for payment. Once entries have been tagged, then Checks can be printed for them or another form of payment can be selected. Payables can also be automatically tagged by clicking on the Tag button as discussed above. |
| • | Hold: Check the Hold column to prevent a Payable from being tagged for payment. It is a recommended practice to use the Hold column for Payables that should not be paid for back-ordered merchandise, dispute with the Vendor or Workroom, etc. to prevent accidentally payment. Any Payable on hold cannot be tagged until the Hold checkmark is removed. |
| • | Vendor Code: The Code of the Vendor for which the Payable was entered. |
| • | Payee Name: The Payee Name for the Vendor from the Vendor / Payee Window – Payee Tab. |
| • | Invoice Date: The date of the bill or invoice from the Vendor. |
| • | Invoice Number: The bill or invoice number will be listed in the Invoice Number column for Vendor Invoices on Project Purchase/Work Orders as well as Operating Expenses. For Payroll Entries, the Period will be displayed while the Purchase/Work Order Number will be listed for Deposits on Project Purchase/Work Orders. |
| • | Payment Due Date: The date that the by which the entry must be paid in full to the Vendor. The Payment Due Date is used by the Tag Invoices To Pay Window by selecting all Payables with a Payment Due Date less than or equal to the date entered by the user. |
| • | Amount to Pay: The Amount to Pay is the amount of the Payable to currently be paid to the Vendor. The Amount to Pay defaults to Original Amount of the Payable less the Already Paid amount, but can be changed by clicking the Edit Amount button as discussed below. |
| • | Original Amount: The amount of the Payable when it was first recorded into Design Manager prior to any subsequent payments. |
| • | Already Paid: The Already Paid column displays the total of past payments recorded for the Payable. |
| • | Discount: Any Vendor Discounts being applied to the Payable, if applicable. |
| • | Purchase Order Number (PO Number): The Purchase/Work Order Number for Vendor Deposits and Invoices for Project Purchase/Work Orders will be listed in this column. |
| • | Transaction Number (TX#): This column shows the unique Transaction Number of the Payable. |
The following buttons appear below the Open Payables Grid along with Tag button described above:
Go To . . .: If a particular Payable on the Open Payables Grid needs to be edited or voided, select the entry and click the Go To button. Doing so will display the Documents and Accounting Window with the selected Payable highlighted. The Payable can then be edited or voided as necessary.
Offset: If two or more Payables for the same Vendor whose sum totals to zero (i.e., positive and negative/credit Payables have been entered for the Vendor), the entries can be dropped from Open Payables Grid and Accounts Payable by tagging the entries and clicking the Offset button. Offsetting Payables is a useful feature when handling credits that have been received from the Vendor.
Edit Amount: Highlighting an entry on the Open Payables Grid and clicking this button will open the Edit Amount To Pay Window. Here the user can choose to pay a portion of a Payable and change the Discount Amount. Upon doing so, the Amount to Pay and Discount columns will update as necessary.
Hand Check/Wire/Debit: Tagging a Payable and clicking this button opens the Invoice Payment Window. If a hand written check, wire transfer payment, or debit card payment were used in paying the Vendor, the Invoice Payment Window is used assign Check Numbers and other Checking Account information.
Credit Card: Clicking the Credit Card button allows the user to select a Credit Card Liability Account on the Select Payment Account Window with which to pay the tagged Payables on the Open Payables Grid.
Pay On-line: Clicking the Pay On-line button allows the user to select a Bank/Checking Asset Account on the Select Payment Account Window with which to pay the tagged Payables on the Open Payables Grid.
Checks: The Checks button opens the Check Run Window where all of the entries tagged for payment will be assigned Check Numbers and can then be physically printed.