Once you have entered specifications for a Project, the next step is to create a Proposal. The Proposal is an estimate that you can provide to your Client to indicate the foreseen price of the agreed upon design work and purchasing. You do not have to create a Proposal. If you desire, you may skip directly to Generating a Purchase Order. However, if you plan to receive a Deposit from your Client to begin your purchasing, then a Proposal is desirable in order to track the usage of the Deposit.
Open the Documents and Accounting Window by clicking on the Documents and Accounting  button on the Tool Bar. The window will open to the Project tab, where you will see a list of all of your Projects. To create a new Proposal, highlight the desired Project and click the Proposal
  button. Alternately, you can right-click the Proposal folder
 ![]() beneath the Project and select New è Proposal to Client. The New Proposal Window will open. This window contains a grid showing all of the active Items that you have entered for this Project. The Items will be displayed in Location Code order but you can click most column headings on the Proposal Items Grid to sort the Items in the manner of your choice. Items that have been set as Inactive or Complete on the Item Window - Status Tab will not be displayed.
beneath the Project and select New è Proposal to Client. The New Proposal Window will open. This window contains a grid showing all of the active Items that you have entered for this Project. The Items will be displayed in Location Code order but you can click most column headings on the Proposal Items Grid to sort the Items in the manner of your choice. Items that have been set as Inactive or Complete on the Item Window - Status Tab will not be displayed.
For a full description of each field on the New Proposal Window, see the New Proposal Window.
Note: Most windows are sizable and can be made bigger by grabbing an edge with the mouse and dragging the window.
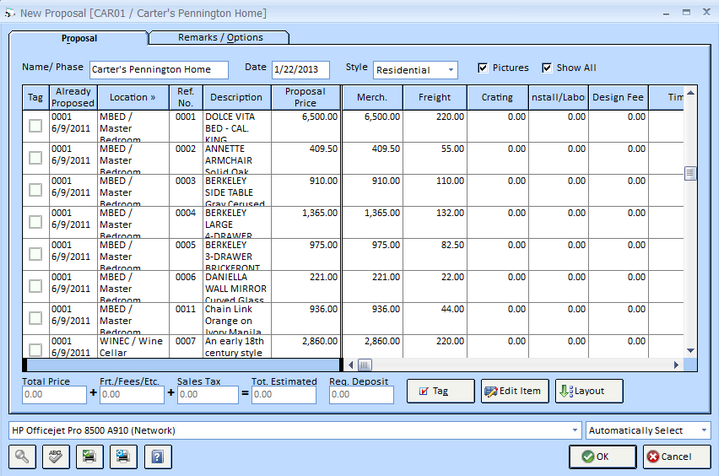
You will need to “tag” or select the Items that you wish to appear on the Proposal. You can tag Items three ways:
| • | You may simply click the box in the Tag column next to the Item you want to include on the Proposal. |
| • | If the Item is already highlighted, hit the Space Bar on your keyboard to tag the Item. |
| • | You may also press the Tag |
The total pricing and deposit information for the Proposal will appear beneath the Proposal Items Grid.
Before you print your Proposal, you may want to add Remarks for the Proposal or adjust the order in which Items and Locations will appear on the printed document. You can do this on the Options Tab. For more information, see New Proposal Window – Options Tab.
If all of the information appears to be correct, then you are ready to print your Proposal. Make sure that the Printer Button Bar menu is set to the proper printer on which you wish to print the Proposal. For more information on printing options, see the Printer Button Bar. Press the OK ![]() button to print the Proposal.
button to print the Proposal.
After the Proposal is sent to the printer or the Print Preview Window has been closed, an Accept or Reject message will appear. Do not make a selection until you have reviewed the Proposal. If all of the information appears to be correct, then click on the Accept ![]() button. This means that the Proposal will be entered into Design Manager. If you need to make corrections, press Reject
button. This means that the Proposal will be entered into Design Manager. If you need to make corrections, press Reject ![]() .
.
Note: When rejecting a Proposal, be careful to write “Reject” on the printed copy or throw it away, so that you do not accidentally send it to the client. If you send a rejected copy of the Proposal, Design Manager will have no record of it.
In order to make changes to an existing Proposal, highlight the Proposal and press the Edit ![]() button on the Documents and Accounting Window. This will open the Edit Proposal Window where you can make any changes and print the Proposal again.
button on the Documents and Accounting Window. This will open the Edit Proposal Window where you can make any changes and print the Proposal again.
You can remove a Proposal by clicking the Delete ![]() button on the Documents and Accounting Window if no Deposits have been recorded for the Proposal.
button on the Documents and Accounting Window if no Deposits have been recorded for the Proposal.