Journal Entries are used to record transactions that affect General Ledger Accounts directly and may be posted to the current Fiscal Month, previous Fiscal Months or even future Fiscal Periods. Examples of a Journal Entries would be the recording of opening balances, owner draws, or officer loans. Journal Entries do not affect other aspects of Design Manager such as the balance on a Client Invoice or an unpaid Vendor Invoice. In other words, creating a Journal Entry to affect the Accounts Receivable Account will change the balance of the Account in the General Ledger but will not change any specific balance for a Project or Client. Note: Journal Entries should only be created if the user is familiar with accounting practices and the proper application of debits and credits to various Account Types. If the user is not completely comfortable with and knowledgeable about Journal Entries it is best to get guidance from the company accountant.
In brief, to create a Journal Entry, select Accounting - Journal Entries which will open the Journal Entries Window. Next, click the Add button to display the Journal Entry Window where the information for the Journal Entry will be entered as shown below.

The Entry Number (Entry No.) is for the company’s tracking purposes only. Design Manager will default a self-incrementing number automatically, but the Entry Number be changed to any five-character code to help identify the Journal Entry. The Entry Number may not, however, be left blank. The Entry Date is the date that the entry will be recorded in the General Ledger. An optional Transaction Description regarding the Journal Entry can be entered for future reference (i.e., "Opening Balance").
Next, click on the Add button to the right of the Journal Entry Distributions Grid to open the Journal Entry Distribution Window.
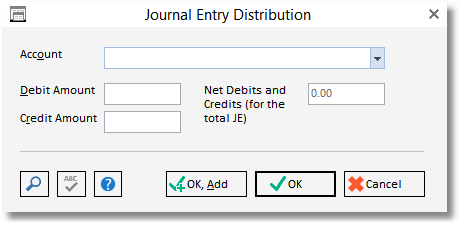
On this window, enter the General Ledger Account Number of the Account that will be affected by the Journal Entry. Either type in Account Number directly or search for one by clicking on the Search button. Next, enter either a Debit Amount or a Credit Amount but not both. Once this information has been entered, click the OK button to return to the previous window. The Journal Entry Distribution should now appear on the Journal Entry Distributions Grid. Press Add again to enter another Journal Entry Distribution and so on. Each Journal Entry must have at least two Journal Entry Distributions.
The Net Debits and Credits will be displayed beneath the Journal Entry Distributions Grid and must be equal to zero upon completing the entry of the Journal Entry Distributions.
When satisfied, click the OK button to save the Journal Entry. Upon doing so, the Journal Entry will appear on the Journal Entries Window - New Tab. Here the Journal Entry can be revised or deleted if necessary, by clicking the Edit and Delete buttons, respectively. To record the Journal Entry into the General Ledger, click the Post button.
Accounting Cheat Sheet:
To Increase the following Account Types
Asset - Debit the account
Liability - Credit the account
Equity - Credit the account
Revenue - Credit the account
COGS - Debit the account
Expense - Debit the account
To Decrease the account, do the opposite action of above.
Account Types that appear on the Balance Sheet: Asset, Liability, Equity
Account Types that appear on the Income Statement: Revenue, COGS, Expenses.