Design Manager allows users to set a budget for an individual Item on the Item Window - Pricing Information Tab. However, some users may find setting budgets at the Sales Category or Location level a more useful method. For instance, a budget could be set for 10,000.00 for the Living Room Location or 2,500.00 can be budgeted for an Accessories Sales Category. In a similar vein, certain defaults, such as the Client Deposit percentage, can be set on the Project Window - Defaults Tab but one may desire to have a different Client Deposit percentage for a specific Sales Categories such as Fabric. Such defaults can be overridden at the Sales Category and Location level. For more information on creating and editing Sales Categories or Locations, see Sales Categories and Locations under Glossaries.
Setting budgets or defaults by Sales Category or Location begins on the Company Information Window - Budget Tab.
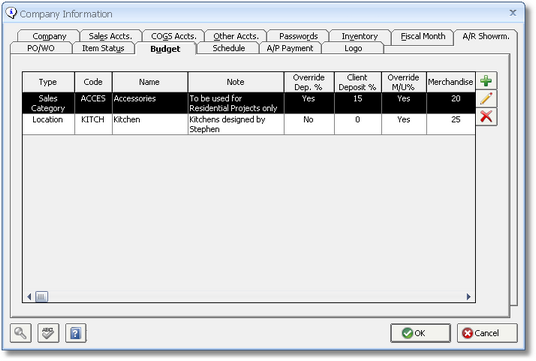
As Design Manager does not come with any preconfigured Budget Entries, to set a budget or default override by Sales Category or Location, click the Add button on the Budget tab which displays the Override Defaults / Budget Window.

On the Override Defaults / Budget Window, first select whether the Budget Entry will be by Sales Category or Location. After selecting, enter the desired code immediately to the right or click on the Search button in the bottom toolbar to find the code.
Note: You can optionally enter a brief phrase which describes the Budget Entry. For example, if you are setting a limit on expenditures for accessories, you may enter "Accessories Budget" into the Note field. Up to 60 characters can be entered.
Budgets: A budget allowance can be configured for each Component Type available in Design Manager along with a total budget figure.
Amount: If it is desired to set a budget for the Sales Category or Location, enter the desired dollar amount for the appropriate Component Type. Remember, this figure can be edited on a per-Project basis on the Project Window - Budgets Tab. As an example, a design firm may wish to keep accessories for any Projects under $2500.00. In such a case, an entry would be created for the Accessories Sales Category with a Budget Amount of $2500.00.
Action: The Budget Action selection determines how Design Manager reacts to the Budget Amount being exceeded. Three selections are available:
| • | None - No action will be taken when the total Project pricing has exceeded the Budget Amount. |
| • | Warning - If Warning is chosen, whenever the total Project pricing exceeds the Budget Amount, by entering Specifications, Accounts Payable, retrieving Inventory, etc., the user will be alerted as such, but will still be allowed to continue with the process. |
| • | Block Entry - Selecting Block Entry will prevent the user from continuing their process as doing so would exceed the Budget Amount. |
Tolerance: The Budget Tolerance allows the user to optionally set a boundary under and over which the Budget Amount will be allowed. For instance, if the Budget Amount is 10,000.00 and there is 10% Tolerance, the Action will only occur when the Project exceeds 11,000.00. Conversely, a Tolerance of -10% would cause the Action to occur when the Project reaches 9,000.00.
Override Client Deposit %: Select this option in order to set a Client Deposit percentage specific to the Sales Category or Location. Doing so will display the Client Deposit % field allowing the desired percentage to be entered. When the Override Client Deposit % option is selected, new Items with the Sales Category or Location will use the recorded percentage instead of Client Deposit % on the Defaults tab of the Project Window.
Override Mark-Up %: The Override Mark-up % option allows the user to set specific Mark-Up/Discount/Fee percentages for each Component Type for the Sales Category or Location. Selecting this option displays the Mark-Up frame with % Types and % fields for all six Component Types available in Design Manager. Choose the proper pricing calculation, either Mark-Up, Discount, or Fee, on the % Type selection and input the desired percentage for each desired Component Type. Design Manager will now use these values for new Items with the Sales Category or Location instead of the defaults recorded on the General tab of the Project Advanced Options Window. An example of using the Override Mark-up % option may be for window treatments. A design firm may mark-up all Merchandise, Freight, Labor, etc. at a uniform 50%. However, the firm wishes for the Merchandise (i.e., fabric, materials) and Labor for window treatments to have a mark-up of 75%. In such case, the Override Mark-Up % option would be utilized for the Window Treatments Sale Category with all Components Type excluding the Merchandise and Labor to be set for Mark-Up at 50%. The Merchandise and Labor Types would, in turn, be set to Mark-Up at 75%.
The entries created here will be automatically applied to all new Projects created in Design Manager. As stated previously, the Budget Entries for an individual Project can be edited, deleted, or created on the Project Window - Budgets Tab.