The Rolodex® Window can be used to view and manage addresses and contacts, synchronize contacts with Microsoft Outlook™ 2003/2007, create an e-mail to a contact, or create a Microsoft Word™ document using Word 2003/2007. The Outlook™ and Word™ functions both require version 2003 or higher to be installed on your computer. The e-mail function requires Outlook™ 2003 or higher but will also work with any other MAPI compliant e-mail system.
![]()
To bring up the Rolodex® Window, click on the Rolodex Button on the toolbar as shown above.
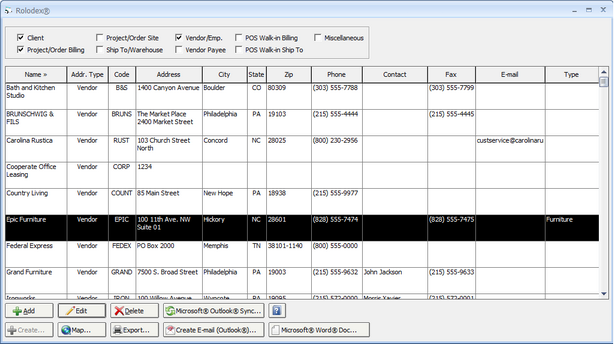
Across the top of the window you may select which address types and contacts that you wish to view. Contacts will show for each type selected and will be sorted by the clicking the desired column heading. The Client, Project Billing, Site, Ship To/Warehouse, Vendor/Employee, and Payee contacts all come from Design Manager’s Glossaries. Editing a contact from here is the same as going to the glossary and changing the contact. The Point of Sale (POS) Walk-in types are created as invoices are entered through the POS System. These POS contacts can bee created and edited from this window. The final type of contact, entitled “Miscellaneous” is provided to store miscellaneous addresses/contacts that do not fit into any of the other categories.
Adding, Editing, Deleting, and Copying Contacts
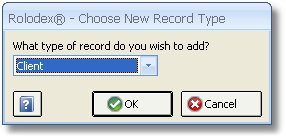
To add an address/contact to the list, click on the Add Button and choose a type to be created.
The Edit and Delete Buttons can be used to change or delete the highlight contact. Note that certain contacts cannot be deleted. For example, Project Site and Billing contacts cannot be deleted from the Rolodex® as a Project must be deleted or closed from the Project Specifications Window. Deleting a Vendor, Client, Ship To from here is the same as deleting it from the corresponding glossary.
The Create Button is used to create a new address/contact from an existing address/contact. This function allows a miscellaneous contact type to be converted into a Vendor, Client, or Ship To. For example, you may use the miscellaneous type to store sales leads. Use the Create Button if you want to create a Client from a sales lead. To do so, highlight the miscellaneous contact for which you want to create a Vendor, Client, or Ship To. Click on the Create Button and select the appropriate new type. Doing so creates a copy of the contact as the new type; it does not delete the original miscellaneous contact. The original contact may be deleted using the Delete Button.

Locating a Contact with the Map Feature
You can quickly locate a contact or determine directions to their site by selecting the contact on the Contacts grid and clicking the Map button. Doing so will launch your default Internet browser displaying Google Maps with the map positioned to the contact's address.
Synchronizing Contacts with Microsoft Outlook™
All contacts and addresses can be exported and/or imported to and from Microsoft Outlook® 2003 Contacts folders. To use this function, you must have Microsoft Outlook 2003 or higher installed on your computer. Outlook™ provides many mail merge, document, and management features using the Microsoft Office™ suite of programs. Before you send contacts to Outlook™, it is a good idea to organize your Outlook® Contact folders. Design Manager suggests creating a new Contacts Folder for each type of Design Manager Address that you wish to synchronize. You must first create these folders in Outlook. Design Manager will allow you to choose the folder but cannot create one. See the Outlook™’s Help system for information about creating Contact folders is Outlook™.
When you are ready to send and/or receive contacts with Outlook™, click on the Microsoft Outlook® Sync Button. Note that this is a manual system; the button must be clicked to execute the exchange of contacts. Upon clicking the button, the following window will appear…
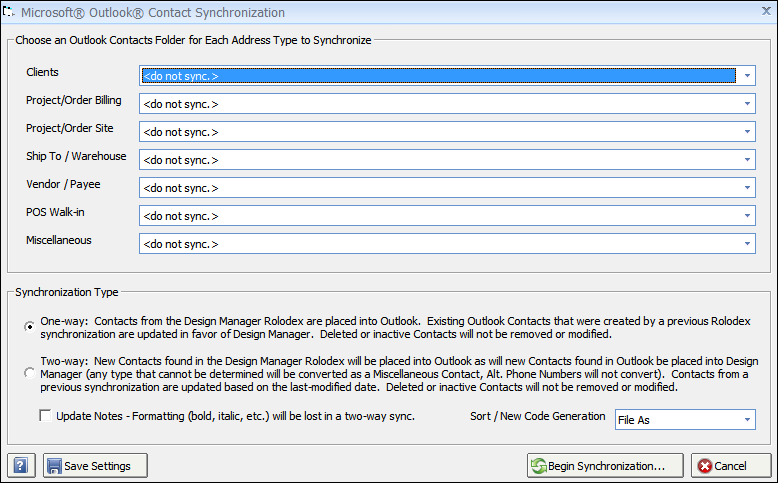
Choose an Outlook® folder for each type of Contact that you wish to synchronize. Next, choose a synchronization type. There are two ways the Design Manager will move addresses between itself and Outlook™.
The first is a “One-way” synchronization. This method simply copies contacts from Design Manager into Outlook. Should the contact already exist in Outlook® it will be changed to match the Design Manager contact. When using a one-way sync, all changes to your contacts such as new phone numbers and updated addresses should be made in Design Manager as any changes made in Outlook® will be lost.
The second method is a “Two-way” synchronization. Using this method, new contacts in the Outlook® folder are also created in Design Manager as well as new contacts in Design Manager are created in Outlook®. Changes made to contacts such as new phone numbers or address changes will be updated based on the last modified date and time of the contact. For example, if a contact was last changed on March 1st in Design Manager and then changes were made on March 2nd to the contact in Outlook™, upon a two-way sync, the Design Manager contact would be changed to match the Outlook information. In a multi-user system, the last user to make a change overrides all other users.
Design Manager recommends using a Two-way sync to bring contacts from Outlook® into Design Manager on the initial synchronization. It is then recommended, especially in a multi-user installation, to use Design Manager as the primary tool to make changes and add new addresses, so that the markedly simpler One-way sync can be used from that time forward.
Selecting the Update Notes option will move the contact notes as well as all of the address and other contact information. Since Outlook™ and Design Manager use different methods for storing the formatting (i.e., bold, underline, etc.) of the notes, the formatting will be lost if using a two-way sync.
Sort/New Code Generation - When synchronizing with Outlook® you have the option for what Design Manager uses to create the Sort and the Code - as in the Design Manager Client, Project or Vendor Code - to use within the program. Each of these options pertains to the corresponding Columns/Fields found in your Outlook® contacts.
The Save Settings Button can be used to save all of the options on the Microsoft® Outlook® Contact Synchronization Window so that you do not need to re-select them next time that you run the synchronization.
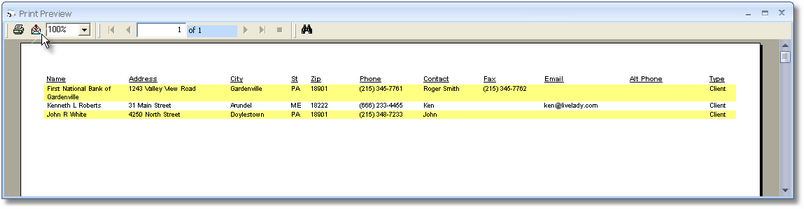
Using the Print/Export Function
The print/export button sends the currently select list of contacts to a printable format that exports cleanly to Microsoft Excel™ or other applications. Simply select the contact types that you would like to export, click the button, select a printer if desired, and click OK. Once the output is shown in the preview window, use the export button along the top of the window to send the contacts to Excel™. Note that even though the printout may cut off a name or address because of limits of the paper size, when exporting the entire name will show.
Creating a Word™ Document
The Microsoft Word™ Document Button can be used to create a document from a special Word™ template. Design Manager will open Word™ and place as much information as possible from the highlighted contact into the new document. Design Manager is shipped with several commonly used templates. ***This option is NOT available when using Pro Cloud without the additional CloudSpace program being purchased.***
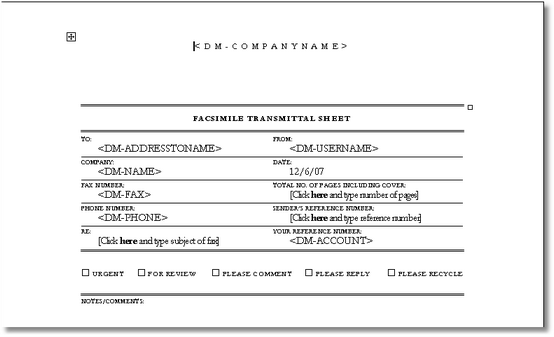
To modify the Design Manager Word® templates or to create new ones, you must edit or save the templates to the Word® Templates folder that is under the Design Manager Installation folder. Design Manager looks for files with the extension (type) .dot or .dotx. To insert Design Manager contact fields into your template, the following codes (text) can be inserted into your template:
<DM-ADDRESSTONAME> |
Follows the “Address To” setting in Design Manager from the Select Template Window. |
<DM-NAME> |
Company Name (Name) |
<DM-CONTACT> |
Contact Name |
<DM-NAME&ADDRESS> |
Contact, Company Name, and Address (with City, State, and Zip) in block format. The Contact and Company Name follow the “Address To” setting in Design Manager from the Select Template Window. |
<DM-ADDRESS> |
Address (with City, State, and Zip) in block format. |
<DM-ADDRESSPART> |
Address part only |
<DM-CITY> |
City |
<DM-STATE> |
State |
<DM-ZIP> |
Zip |
<DM-PHONE> |
Phone |
<DM-FAX> |
Fax |
<DM-EMAIL> |
E-mail Address |
<DM-ALTNAME1> |
Alt. Name / Phone Desc. 1 |
<DM-ALTPHONE1> |
Alt. Phone 1 |
<DM-ALTNAME2> |
Alt. Name / Phone Desc. 2 |
<DM-ALTPHONE2> |
Alt. Phone 2 |
<DM-WEBSITE> |
Website |
<DM-CODE> |
Client / Project / Vendor Code |
<DM-ACCOUNT> |
Vendor Account Number / Project Order Number |
<DM-SORTNAME> |
Sort By Name (Last, First). |
<DM-USERNAME> |
Name of Design Manager User |
<DM-USERTITLE> |
Job Title of Design Manager User |
<DM-USEREMAIL> |
E-mail of Design Manager User |
<DM-COMPANYNAME&ADDRESS> |
Your Company Name and Address (with City, State, and Zip) in block format |
<DM-COMPANYADDRESS> |
Your Company Address (with City, State, Zip) |
<DM-COMPANYADDRESSPART> |
Your Company Address part only |
<DM-COMPANYCITY> |
City |
<DM-COMPANYSTATE> |
State |
<DM-COMPANYZIP> |
Zip |
<DM-COMPANYPHONE> |
Phone |
<DM-COMPANYFAX> |
Fax |
<DM-COMPANYEMAIL> |
E-mail Address |
<DM-COMPANYWEBSITE> |
Website |
Wherever one of the above codes is located in your template, Design Manager will substitute the respective information from the highlighted contact. For example, if your template included the sentence:
Thank you for your order, <DM-CONTACT>.
When the template is used and Mr. Johnson is the highlighted contact, the text would read:
Thank you for your order, Mr. Johnson.
The code must exactly as shown in the above table, with the <> around the exact text.
Creating an E-mail:
Use the Create E-mail Button to display an E-mail Window with the e-mail address of the highlighted contact. When using Microsoft Outlook™, the E-mail Window will be Outlook™’s E-mail Message Window. Outlook Express cannot be used, Outlook™ must be version 2003 or higher. When using some other type of e-mail program, a standard e-mail dialog is opened which may have reduced functionality. If you have trouble launching your e-mail application, go to the File à User Settings and click on option to use MAPI instead of Outlook™ for e-mail.
Design Manager E-mail functions will only work with a MAPI compliant e-mail system or Outlook™ 2003 or higher.