The third tab on the Checking Window is the Checkbook Tab which shows, in chronological order, all Deposits, Checks and other entries that affect the selected Cash Account.
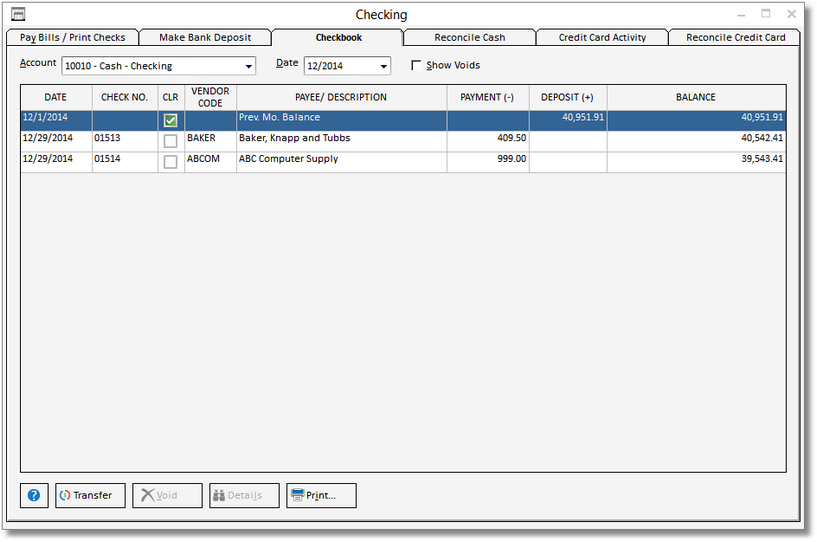
Account: The Account menu shows the Account Number and Name of the Cash Account for which information on the Checkbook Grid is being displayed. If more than one Cash Account have been entered in the Account Glossary Window, click on the down arrow to the right of the field to select a different Account.
Date: The Date menu allows you to select any month in which to view the Checkbook. Click on the down arrow to the right of the field to select a different month. The Checkbook Grid will always display the previous month’s balance as the first entry and then list all activity in the selected month.
Show Voids: Select this option to show all Checks that have been voided or are missing. By default, voided Checks do not show. The Show Voids option will display voided Checks as well as any missing Checks. Missing Checks are defined by a gap in Check numbering (i.e., if Design Manager has Check Number 1700 and 1703 recorded, then 1701 and 1702 will be reported as missing).
Checkbook Grid: The Checkbook Grid lists one line per Check, Deposit, Journal Entry, or other transaction. A Deposit can be made up of many different Cash Receipts entered on a given date and Deposit Slip Number. Click the Details button to view a list of Receipts that make up a Deposit or to view the Journal Entry or other transaction .The grid has the following columns:
| • | Date: This is the date of the Check, Deposit, cash transfer, or Journal Entry . |
| • | Check Number (Check No.): This is the Number of the Check, Wire Transfer, or Debit/ATM payment. |
| • | Clear: The Clear column indicates whether a Check, Deposit, Transfer, etc. has been cleared the bank. |
| • | Vendor Code: For Check entries, the Vendor Code will be displayed in this column. |
| • | Payee / Description: This column displays either the Payee Name for Checks, the Deposit Slip Number for Cash Receipts, or a description for other transactions affecting the Cash Account. |
| • | Payment (-): The Payment column shows the amount of the Check or other transaction that reduces cash. |
| • | Deposit (+): The Deposit column shows the amount of the Deposit or transaction that increases cash. |
| • | Balance: The running balance reflecting the net change to cash after each transaction. |
The following buttons are located below the Checking grid:
![]() Help: Brings up the Design Manager Help manual for this screen.
Help: Brings up the Design Manager Help manual for this screen.
![]() Transfer: The Transfer button allows you to record the transfer of funds between Cash/Checking Accounts. Clicking this button displays the Transfer Cash Window where you can input the cash transfer information. See the Transfer Cash Window for more details.
Transfer: The Transfer button allows you to record the transfer of funds between Cash/Checking Accounts. Clicking this button displays the Transfer Cash Window where you can input the cash transfer information. See the Transfer Cash Window for more details.
![]() Void: To void a Check, select the Check on the Checkbook grid and click on the Void button. Upon doing so, you will be asked "Do you wish to void the highlighted Check? If you answer Yes, this Check will be permanently removed and Vendor Invoice or Deposit that it pays will be returned to open payables." Click Yes to void the Check. Voiding the Check will reverse it from Design Manager and place the original Payable(s) back on the Open Payables Grid of the Checking Window - Pay Bills /Print Checks Tab and back into Accounts Payable.
Void: To void a Check, select the Check on the Checkbook grid and click on the Void button. Upon doing so, you will be asked "Do you wish to void the highlighted Check? If you answer Yes, this Check will be permanently removed and Vendor Invoice or Deposit that it pays will be returned to open payables." Click Yes to void the Check. Voiding the Check will reverse it from Design Manager and place the original Payable(s) back on the Open Payables Grid of the Checking Window - Pay Bills /Print Checks Tab and back into Accounts Payable.
![]() Details: To view more detailed information for a Checkbook entry, highlight the entry and click on this button. For Checks, the Check Detail Window will be displayed which shows a list of Payables for which the Check pays. For Deposits, it will show a list of Cash Receipts that make up a Deposit. For Journal Entries or other transactions, the Documents and Accounting Window will be displayed, positioned to the transaction that created the Checkbook entry.
Details: To view more detailed information for a Checkbook entry, highlight the entry and click on this button. For Checks, the Check Detail Window will be displayed which shows a list of Payables for which the Check pays. For Deposits, it will show a list of Cash Receipts that make up a Deposit. For Journal Entries or other transactions, the Documents and Accounting Window will be displayed, positioned to the transaction that created the Checkbook entry.
![]() Print: Clicking on this button will print the Check Register Report which lists the entries displayed on the Checkbook Grid for the current month selected.
Print: Clicking on this button will print the Check Register Report which lists the entries displayed on the Checkbook Grid for the current month selected.