At some point you will receive the final bill from your Vendor. You should enter your bills into Design Manager when you receive them, even though they may not be due until a later date. The Check can be written later when the bill is actually due. To record a Vendor Invoice, select the Purchase or Work Order on the Documents and Accounting Window and click the Vendor Invoice button or right-click the Purchase/Work Order and select New è Invoice/Bill from Vendor/Payee. You can do this from either the Project or Vendor Tab. The Vendor Deposit, Invoice, or Operating Expense Window will open with the Type set to Invoice for a Project PO.
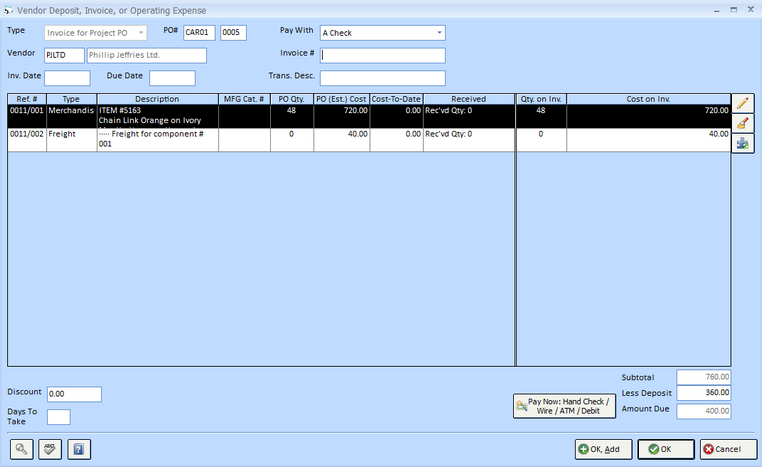
The Purchase Order Number (PO Number) and Vendor Code and Name will appear in the appropriate fields. You may change the Vendor Code if you are paying a different company than the original Purchase/Work Order Vendor/Workroom as in the case when there is a separate entity for freight or shipping. Choose the proper method to pay the invoice in the Pay With menu which will default to “A Check”. To choose to pay with a Credit Card, select the desired Credit Card from the menu. For more information on using a Credit Card to pay your Vendor/Workroom, see Paying a Vendor with a Credit Card. Enter the Invoice Number (Invoice #) and Invoice Date, as well as the Due Date that is printed on the bill. The Due Date will automatically to the Invoice Date or, if the Payment Due Days has been input on the Vendor / Payee Window - Defaults Tab for the Vendor/Workroom, the Invoice Date plus the Payment Due Days. Each Component that was included on the Purchase/Work Order will be listed on the Purchase/Work Order Components Grid.
Below the grid, the Subtotal of all merchandise, freight, etc. will appear, as well as the total of all Deposits previously recorded for the Purchase/Work Order in the Less Deposit field. Design Manager will calculate the total Amount Due by reducing the Subtotal by the Less Deposit amount. If the Vendor/Workroom offers a discount for early payment, and the discount information on the Vendor Window – Defaults Tab was entered, then the Discount amount and number of Days To Take the discount will be displayed. You can enter a Discount and Days to Take manually. Please note that this will not affect the Amount Due. Only the amount for which the Check will be written or charged to the Credit Card will be affected, provided the Invoice is paid before the deadline. Sometimes the Vendor Invoice will only be for a portion of the original Purchase/Work Order. In this case, the cost of the Component(s) need to adjusted or removed. To do so, select the Component on the Purchase/Work Order Components Grid and click the Edit ![]() button to the right of the grid. This will open the Vendor Invoice Distribution Window.
button to the right of the grid. This will open the Vendor Invoice Distribution Window.

Here the costs for the Invoice can be changed as well as entering tracking information for the Purchase/Work Order. Sometimes additional charges such as freight or delivery were not included on the Purchase Order but are included on the bill from the Vendor/Workroom. Enter these new charges in the appropriate field. Design Manager will automatically create a new Component under the Item to support the additional charge. There is no need to edit the Purchase/Work Order to include the additional charge! Press the OK ![]() button when any necessary changes have been made.
button when any necessary changes have been made.
If the Vendor Invoice is for a single Component on a large Purchase/Work Order, click the Clear ![]() button to remove the current costs from all Components on the Purchase or Work Order. Then input the proper cost on the Component for which is now being paid as described above.
button to remove the current costs from all Components on the Purchase or Work Order. Then input the proper cost on the Component for which is now being paid as described above.
Sometimes it may be desirable to spread an additional charge from the Vendor across all Components on the Purchase/Work Order such as a single delivery charge that is not itemized per Component. In such a case, click the Distribute Cost ![]() button to display the Distribute Invoice Cost Window whereupon the total cost can be spread across all Components under a variety of conditions.
button to display the Distribute Invoice Cost Window whereupon the total cost can be spread across all Components under a variety of conditions.
Important: Make sure that the cost of each Component on the Purchase/Work Order Components Grid matches the corresponding entry on the bill. Insure that the Amount Due field matches the amount due of the bill!
If paying with a hand written check or a wire transfer/debit card, click on the Pay Now: Hand Check / Wire / ATM / Debit ![]() button to enter the payment information on the Invoice Payment Window. If a check is going to be physically printed on the printer, do not click the Pay Now button.
button to enter the payment information on the Invoice Payment Window. If a check is going to be physically printed on the printer, do not click the Pay Now button.
Click the OK ![]() button to save the new Vendor Invoice. The Vendor Invoice will now appear on the Documents and Accounting Window below the Purchase or Work Order, displaying the Invoice Number and Date and Amount of the Vendor Invoice. If you recorded a hand check/electronic payment, you'll notice the payment information as well which shows the Check/Transfer Number, Date, Amount, and Payee for the payment.
button to save the new Vendor Invoice. The Vendor Invoice will now appear on the Documents and Accounting Window below the Purchase or Work Order, displaying the Invoice Number and Date and Amount of the Vendor Invoice. If you recorded a hand check/electronic payment, you'll notice the payment information as well which shows the Check/Transfer Number, Date, Amount, and Payee for the payment.
Additional Vendor Invoices:
Quite commonly, multiple Vendor Invoices for a single Purchase or Work Order will need to be recorded. Here are a few examples of such cases:
| • | The company is not being billed for all of the merchandise on the Purchase/Work Order at the same time. |
| • | A portion of the merchandise is on back-ordered and the company will be billed when it arrives. |
| • | Separate invoices for freight or installation charges were received. |
Additional Vendor Invoices are recorded in the same manner as recording the first Invoice. Design Manager, however, will now only display costs for merchandise that has not yet been paid. In other words, if a prior Vendor Invoice was recorded for some Components on the Purchase/Work Order, but not others, only those that are not yet purchased will be included in the Invoice total. Costs can be adjusted as necessary on the Vendor Invoice Distribution Window. If a freight or installation bill has been received, all of the costs may already be zero. Only the appropriate freight or installation cost may need to recorded to match the invoice received.
If a Check needs to be printed through Design Manager, see Printing Checks.
A full description of the windows mentioned above are available under Vendor Invoice for a Project or Work Order, Vendor Invoice Distribution Window, and Distribute Invoice Cost Window.
Accounting: Upon making a Vendor Invoice for a Project Purchase/Work Order, Design Manager will credit the Accounts Payable Account and debit either the Work in Process Account or a Cost of Goods Sold Account depending on the setting of the Auto WIP Accounting option on the Company Advanced Options Window - General Tab. If this is not selected, then a Cost of Goods Sold Account will be debited. If Auto WIP Accounting is selected, then the Bypass WIP option on the Vendor Invoice Distribution Window determines the Account to be debited. If the option is selected, Cost of Goods Sold will be debited. If not, Work in Process will receive the debit. If Cost of Goods Sold will be affected, the exact COGS Account can be determined by the Sales Category of the Item. If WIP will be affected, upon invoicing the Client for the goods and services, the activity will be transferred from Work in Process to the Cost of Goods Sold Account of the Sales Category. The Vendor Invoice will remain on Accounts Payable until a Check or other form of payment is applied to the Invoice. If the Pay Now button was used, then Design Manager will further debit the Accounts Payable Account and credit the designated Cash Account. If the Vendor Invoice is being paid with a Credit Card, the Credit Card Liability Account, rather than Accounts Payable, will be credited. For more information, see Understanding Sales Categories and Work in Process.