The New Purchase / Work Order(s) Window is accessed through the Documents and Accounting Window by selecting the Project and clicking on the Purchase Order/Work Order (PO/Work Order)  button. This window shows Components in a Project and allows you to "tag" or select Components to appear on Purchase Orders to Vendors and Work Orders to workrooms. Once you have tagged the Components you wish to include on a Purchase or Work Order, you can print a copy of the Purchase/Work Order. If the information on the document(s) appears to be correct, you can then "Accept" the Purchase/Work Orders and they will be processed into Design Manager.
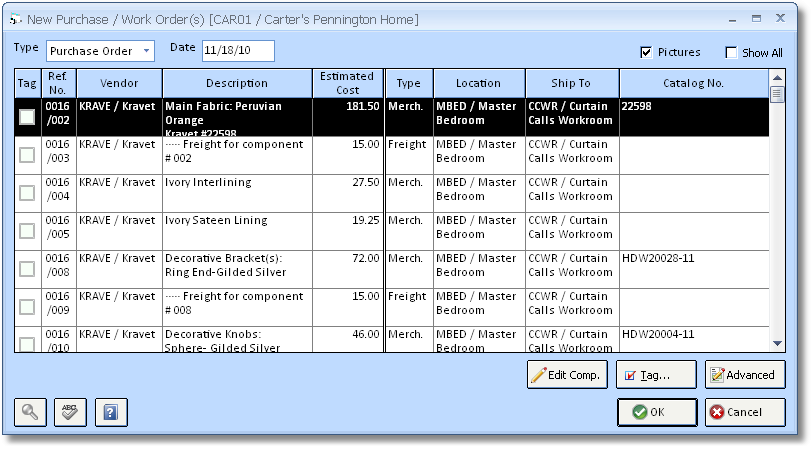
Type: The Type menu determines whether you are generating Purchase or Work Orders. Depending on your selection, the columns on the Purchase Order Components Grid will vary slightly.
Date: This is the date that is printed on the Purchase/Work Order(s). For Purchase Orders,this is the date upon which the Components on the Purchase Order(s) are considered ordered from the Vendor. Similarly, for Work Orders, this will be the date by which the Components are considered to be destined for fabrication by the workroom.
Show All: For Purchase Orders, only Components that have not been previously included on a Purchase Order. Selecting the Show All option will display all Components within the Project that have a Vendor and Ship-To recorded regardless if they have been purchased or not. Components from Item that have been designated as Inactive or Complete will not be displayed. Clicking the Show All option will display the Already Purchased (Already Purchsd.) column. When creating a Work Order, the Show All option will automatically displayed as many Components will require to be included on both a Purchase Order and a Work Order.
Pictures: Selecting the Pictures option will display the image stored on the Component Window - Picture Tab alongside the Component on the Purchase or Work Order document.
Edit Component (Edit Comp.): ![]() Use the Edit Component button to a display the Component Window for the highlighted Component which will allow you to easily make any necessary changes to the Component prior to ordering.
Use the Edit Component button to a display the Component Window for the highlighted Component which will allow you to easily make any necessary changes to the Component prior to ordering.
Tag: ![]() Click this button to open the Tag Components for a Purchase Order Window. This window contains several options for Component "tagging" or selecting groups of Components to be included on a Purchase or Work Order. You may also tag individual Components by clicking the Tag column before each Component on the Purchase Order Components Grid. For more information, see the Tag Components for a Purchase/Work Order Window.
Click this button to open the Tag Components for a Purchase Order Window. This window contains several options for Component "tagging" or selecting groups of Components to be included on a Purchase or Work Order. You may also tag individual Components by clicking the Tag column before each Component on the Purchase Order Components Grid. For more information, see the Tag Components for a Purchase/Work Order Window.
Advanced: ![]() The Advanced button opens the Project Advanced Options Window – PO Tab where you can change the printing options for Purchase Orders for this Project. For a full description of the Purchase Order options, see the Project Advanced Options Window - PO Tab.
The Advanced button opens the Project Advanced Options Window – PO Tab where you can change the printing options for Purchase Orders for this Project. For a full description of the Purchase Order options, see the Project Advanced Options Window - PO Tab.
Purchase Order Components Grid: This grid displays purchasing and workroom information from the Component Window. The Tag column allow you to "tag" or select Components to include on a Purchase or Work Order. The columns on this grid are explained below:
Tag: Check the box in this column to "tag" or select a Component to be on the Purchase or Work Order.
Already Purchased (Already Prchsd.): If the Component has already been included on a Purchase Order, then the Purchase Order Number and Ordered Date will be displayed in this column. If a Component has been included on multiple Purchase Orders, only the most recent Purchase Order Number and Ordered Date will be shown. When the Show All option is selected, Components that have already been purchased will appear to the bottom of the grid.
Reference Number (Ref. No.): This column shows the Component Reference Number.
Vendor/Workroom: For Purchase Orders, the Vendor Code and Name from which the Component is being ordered will be shown while the Workroom (Vendor) from the Item Window - Workroom Tab will be displayed when creating a Work Order.
Description: A portion of the Component's Description is shown in this column. Hovering the cursor over the description will briefly display the entire Component Description for your reference.
Estimated Cost: The Extended Cost of the Component.
Type: This column displays the Component Type for the Component.
Location: The Location Code and Name of the Item for which the Component is being ordered/fabricated is displayed in this column.
Ship To: The Ship-To Code and Name to where the Component will initially be delivered.
Ordered from Vendor: This column is only displayed when creating Work Orders and displays the Vendor Name and Code for the Component. The Vendor is who is providing the merchandise that will be shipped to the Workroom Vendor shown in the Workroom column.
Catalog Number (Catalog No.): The optional Manufacturer’s Catalog Number for the Component will be shown here.
Double-clicking a Component on the Purchase Order Components Grid will also display the Component Window to allow you to make changes to the Component.
Printing Purchase/Work Orders: Once you have selected the desired Components, click on the OK button to open the Generated Purchase Order(s) Window from where Purchase and Work Orders can be printed.
Examples of Purchase Orders and Work Orders
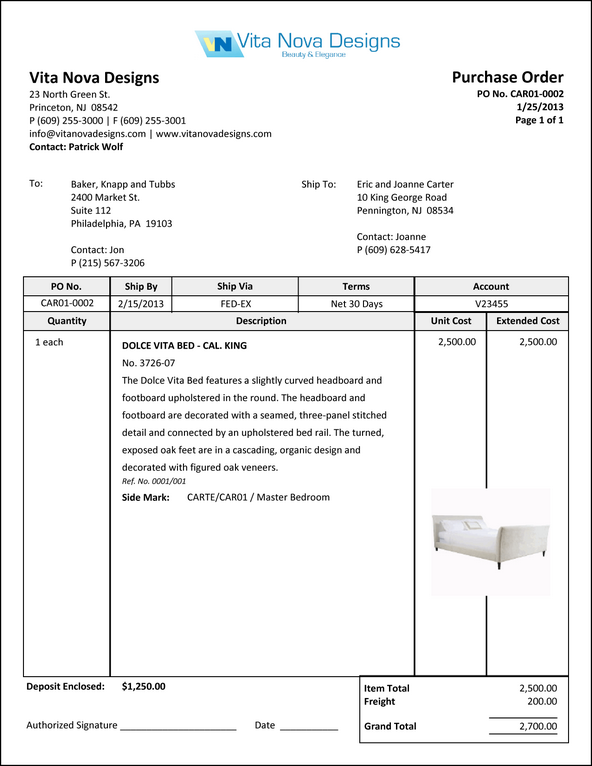
Purchase Order Classic:

Purchase Order Modern:
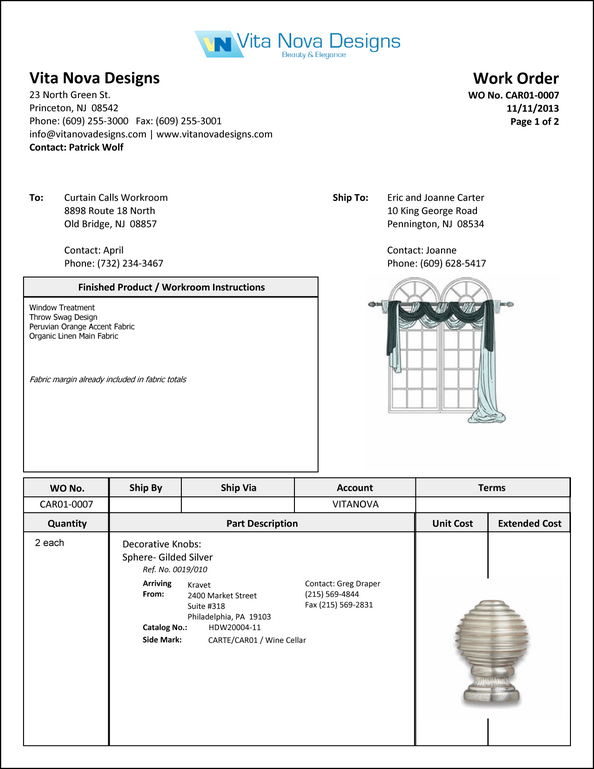
Work Order Classic:
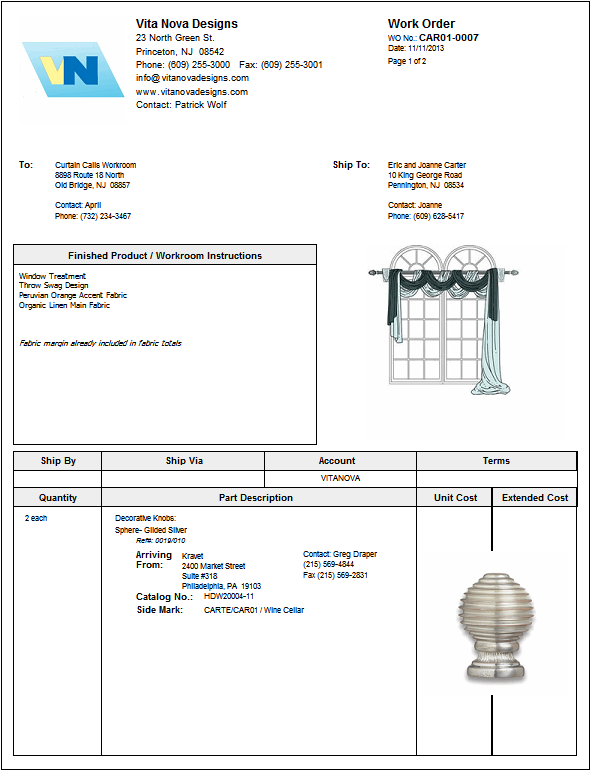
Work Order Modern: