The Address Book Window can be used to view and manage addresses and contacts, synchronize contacts with Microsoft Outlook™, create an e-mail to a contact, print labels and envelopes, prepare addresses for export into Microsoft Excel™, or create a Microsoft Word™ document. The Outlook™ and Word™ functions both require version 2003 or higher to be installed on your computer. The e-mail function requires Outlook™ 2003 or another MAPI compliant e-mail system.

To bring up the Address Book Window, click on the Address Book button on the toolbar as shown above.
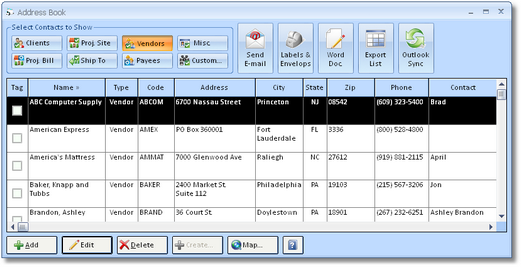
You can choose which types of contacts to display on the Contacts Grid by selecting the desired type in the Select Contacts to Show frame. You can choose as many of the selections as desired. The type of available contacts are as follows:
![]() Clients: All active Clients from the Client Glossary Window.
Clients: All active Clients from the Client Glossary Window.
![]() Project Billing (Proj. Bill): The Project Billing Address as recorded on the Project Window - Project Tab for all open Projects.
Project Billing (Proj. Bill): The Project Billing Address as recorded on the Project Window - Project Tab for all open Projects.
![]() Project Site (Proj. Site): The Project Site Address as recorded on the Project Window - Project Tab for all open Projects.
Project Site (Proj. Site): The Project Site Address as recorded on the Project Window - Project Tab for all open Projects.
![]() Ship To: All active Ship To Addresses from the Ship To Code Glossary.
Ship To: All active Ship To Addresses from the Ship To Code Glossary.
![]() Vendors: The Vendor Address as recorded on the Vendor / Payee Window - Vendor Tab for all active Vendors.
Vendors: The Vendor Address as recorded on the Vendor / Payee Window - Vendor Tab for all active Vendors.
![]() Payees: The Vendor Payee Address as recorded on the Vendor / Payee Window - Payee Tab for all active Vendors.
Payees: The Vendor Payee Address as recorded on the Vendor / Payee Window - Payee Tab for all active Vendors.
![]() Miscellaneous (Misc.): Any Miscellaneous Addresses created as described under the Address Book Choose New Record Type Window below.
Miscellaneous (Misc.): Any Miscellaneous Addresses created as described under the Address Book Choose New Record Type Window below.
![]() Custom: The Custom button will display the Select Addresses Window.
Custom: The Custom button will display the Select Addresses Window.
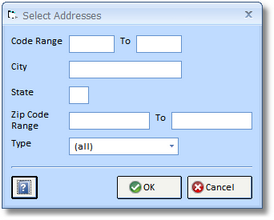
You can use the Select Addresses Window to narrow the list of contacts on the Contacts Grid by inputting a Code Range, City, State, or Zip Code Range. The Code Range allows you to only display contacts, regardless of their type, within a certain subset of Codes. Entering a City will only display contacts that have the same City. Note that the City much match precisely. The State will reduce the contacts to only those have the same State. The Zip Code Range allows you to show contacts that have a particular subset of Zip Codes. The Type drop down menu will allow you to show ONLY those Contacts with the chosen Type. Input any combination of these criteria and then click the OK button to update the Contacts Grid.
Adding, Editing, Deleting, and Copying Contacts
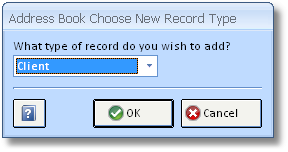
To add an address/contact to the list, click on the Add button and choose a type to be created.
The Edit and Delete buttons can be used to change or delete the highlight contact. Note that certain contacts cannot be deleted. For example, Project Site and Billing contacts cannot be deleted from the Address Book Window as a Project must be deleted or closed from the Project and Specifications Window. Editing or deleting a contact from the Address Book Window is the same as deleting it from the corresponding glossary or Project Window.
The Create button is used to create a new Vendor/Payee, Client, or Ship To from an existing Other contact. For example, you may use the Other type to store sales leads. You can use the Create button if you want to create a Client from a sales lead. To create a new contact, highlight the Other address for which you want to create a Vendor, Client, or Ship To. Click on the Create button and select the appropriate new type on the Create New Contact From Existing Window.
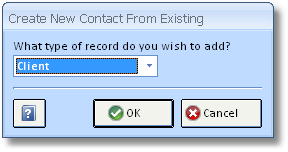
Doing so creates a copy of the contact as the new type; it does not delete the original Other contact. The original contact may be deleted using the Delete button.
Locating a Contact with the Map Feature
You can quickly locate a contact or determine directions to a contact site by selecting the contact on the Contacts Grid and clicking the Map button. Doing so will launch your default Internet browser displaying Google Maps with the map positioned to the contact's address.
Send E-mail: You can create an e-mail for a single or multiple contacts by clicking the Tag column for each desired contact then clicking the Send E-mail button. Depending on the E-mail Setting on the User Settings Window, as follows:
| • | Outlook - When Outlook is selected, Design Manager will launch Outlook™’s E-mail Message Window with all of the features normally associated with that program. Each tagged contact that has an E-mail address entered will have the E-mail address displayed in the To... field so that the E-mail can be completed and sent. Note: Outlook Express cannot be used and Outlook™ must be version 2003 or higher. |
| • | MAPI and Save PDF - When either of these selections are chosen, a basic E-mail Window is launched which may have reduced functionality. As this window lacks a more advanced interface, only the E-mail address of the last tagged contact will be displayed in the To: field. |
| • | SMTP - If SMTP is selected, a more advanced E-mail Window is displayed with the E-mail address of each tagged contact in the To: field. The SMTP E-mail Window has more robust features including adding attachments to the E-mail, having Blind Carbon Copies (Bcc:), etc. |
For more information on configuring your E-mail with Design Manager, see the User Settings Window under Additional Features.
You can print mailing labels or envelopes for contacts using three different options:
| • | You can print labels or envelopes for all the contacts currently listed on the Contacts Grid. |
| • | You can choose particular contacts by clicking the Tag column on the Contacts Grid so that labels or envelopes will be printed for only those specific contacts. |
| • | You can print a label or envelope for the contact current highlighted on the Contacts Grid. |
To print the labels or envelopes, click the Labels & Envelopes (Labels & Envlps.) button which will display the Address Labels and Envelopes Report Window.

Choose whether to print labels or envelopes for Tagged Records, All Records, or the Highlighted Record on the Select Records menu. Choose whether you are printing Labels or Envelopes in the Mailing Format selection. You can also choose to print in order of the contact Name or Zip Code with the Sort By selection. Select either Laser or Ink Jet under the Printer Type depending on the model of your printer and whether or not to include the Contact Name in the address. If you are printing labels, you can choose the proper label format under the Label Type menu. Select a printer if desired, and click OK to print the labels or envelopes.
Word® Document:
*If you do not have Microsoft Outlook®, or are a Cloud User you will not have access to Word Docs.
The Word Document (Word Doc.) button can be used to create a document from a special Word® template. Design Manager will open Word® and place as much information as possible from the highlighted contact on the Contacts Grid into the new document. Design Manager is shipped with several commonly used templates.

To modify the Design Manager Word® templates or to create new ones, you must edit or save the templates to the Word® Templates folder that is under the Design Manager Installation folder. To insert Design Manager address and contact fields into your template, the following codes can be used:
<DM-ADDRESSTONAME> |
Follows the “Address To” setting in Design Manager from the Select Template Window. |
<DM-NAME> |
Company Name (Name) |
<DM-CONTACT> |
Contact Name |
<DM-NAME&ADDRESS> |
Contact, Company Name, and Address (with City, State, and Zip) in block format. The Contact and Company Name follow the “Address To” setting in Design Manager from the Select Template Window. |
<DM-ADDRESS> |
Address (with City, State, and Zip) in block format. |
<DM-ADDRESSPART> |
Address part only |
<DM-CITY> |
City |
<DM-STATE> |
State |
<DM-ZIP> |
Zip |
<DM-PHONE> |
Phone |
<DM-FAX> |
Fax |
<DM-EMAIL> |
E-mail Address |
<DM-ALTNAME1> |
Alt. Name / Phone Desc. 1 |
<DM-ALTPHONE1> |
Alt. Phone 1 |
<DM-ALTNAME2> |
Alt. Name / Phone Desc. 2 |
<DM-ALTPHONE2> |
Alt. Phone 2 |
<DM-WEBSITE> |
Website |
<DM-CODE> |
Client / Project / Vendor Code |
<DM-ACCOUNT> |
Vendor Account Number / Project Order Number |
<DM-SORTNAME> |
Sort By Name (Last, First). |
<DM-USERNAME> |
Name of Design Manager User |
<DM-USERTITLE> |
Job Title of Design Manager User |
<DM-USEREMAIL> |
E-mail of Design Manager User |
<DM-COMPANYNAME&ADDRESS> |
Your Company Name and Address (with City, State, and Zip) in block format |
<DM-COMPANYADDRESS> |
Your Company Address (with City, State, Zip) |
<DM-COMPANYADDRESSPART> |
Your Company Address part only |
<DM-COMPANYCITY> |
City |
<DM-COMPANYSTATE> |
State |
<DM-COMPANYZIP> |
Zip |
<DM-COMPANYPHONE> |
Phone |
<DM-COMPANYFAX> |
Fax |
<DM-COMPANYEMAIL> |
E-mail Address |
<DM-COMPANYWEBSITE> |
Website |
Wherever one of the above codes is located in your template, Design Manager will substitute the respective information from the highlighted contact. For example, if your template included the sentence:
Thank you for your order, <DM-CONTACT>.
When the template is used and Mr. Johnson is the highlighted contact, the text would read:
Thank you for your order, Mr. Johnson.
The code must exactly as shown in the above table, with the <> around the exact text.
Using the Export/Print Function (Export List)
The Export List button sends the list of contacts to a printable format that exports cleanly to Microsoft Excel™ or other applications. You have two options when exporting contacts:
| • | You can export all the contacts currently listed on the Contacts Grid. |
| • | You can choose particular contacts by clicking the Tag column on the Contacts Grid so that only those specific contacts will be exported. |
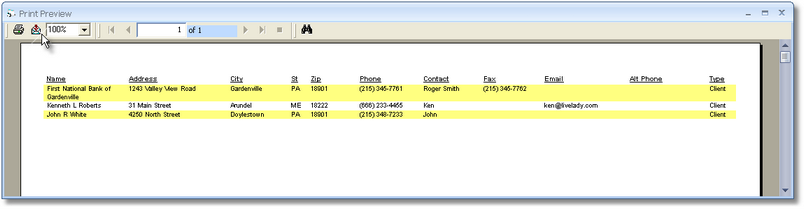
To export, click the Export List button which will display the Export Contacts Report Window.
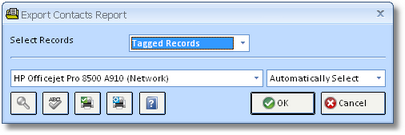
Choose whether to export All Records or Tagged Records on the Select Records menu, select a printer if desired, and click OK. Once the output is shown in the preview window, use the export button along the top of the window to send the contacts to Excel™. Note that even though the preview may truncate a name or address because of limits of the paper size, when exporting the entire name will show.
Synchronizing Contacts with Microsoft Outlook®
*If you do not have Microsoft Outlook®, or are a Cloud User - see File Import on how to Import Contacts.
All contacts and addresses can be exported and/or imported to and Microsoft Outlook® Contacts folder. To use this function, you must have Microsoft Outlook 2003 or higher installed on your computer. Outlook® provides many mail merge, document, and management features using the Microsoft Office® suite of programs. Before you send contacts to Outlook, it is a good idea to organize your Outlook® Contact folders. Design Manager suggests creating a new Contacts Folder for each type of Design Manager Address that you wish to synchronize. You must first create folders in Outlook. Design Manager will allow you to choose the folder but cannot create one. See the Outlook®’s Help system for information about creating Contact folders in Outlook®.
When you are ready to send and/or receive contacts with Outlook®, click on the Outlook Sync button. Note that this is a manual system; the button must be clicked to execute the exchange of contacts. Upon clicking the button, the Microsoft Outlook® Contact Synchronization Window will be displayed.

Choose an Outlook® Contacts Folder for each type of Contact that you wish to synchronize. Next, choose a Synchronization Type. There are two ways the Design Manager will move addresses between itself and Outlook®:
| • | “One-way” Synchronization: This method simply copies contacts from Design Manager into Outlook. Should the contact already exist in Outlook® it will be changed to match the Design Manager contact. When using a one-way synchronization, all changes to your contacts such as new phone numbers and updated addresses should be made in Design Manager as any changes made in Outlook® will be lost. |
| • | “Two-way” Synchronization: Under this method, new contacts in the Outlook® folder are also created in Design Manager as well as new contacts in Design Manager are created in Outlook®. Changes made to contacts such as new phone numbers or address changes will be updated based on the last modified date and time of the contact. For example, if a contact was last changed on March 1st in Design Manager and then changes where made on March 2nd to the contact in Outlook®, upon a two-way synchronization, the Design Manager contact would be changed to match the Outlook information. In a multi-user Design Manager setting, the last user to make a change overrides all other users. |
Design Manager recommends using a two-way synchronization to bring contacts from Outlook® into Design Manager on the initial synchronization. It is then recommended, especially in a multi-user installation, to use Design Manager as the primary tool to make changes and add new addresses, so that the markedly simpler one-way synchronization can be used from that time forward.
Selecting the Update Notes option will move the contact notes along with all of the address and other contact information. Since Outlook® and Design Manager use different methods for storing the formatting (i.e., bold, underline, etc.) of the notes, the formatting will be lost if using a two-way synchronization.
Sort/New Code Generation - When synchronizing with Outlook® you have the option for what Design Manager uses to create the Sort and the Code - as in the Design Manager Client, Project or Vendor Code - to use within the program. Each of these options pertains to the corresponding Columns/Fields found in your Outlook® contacts.
The Save Settings button can be used to save all of the options on the Microsoft® Outlook® Contact Synchronization Window so that you do not need to select them again the next time that you run a synchronization.
To run a synchronization, click the Begin Synchronization button. Upon doing so, you will be asked "Are you sure that you want to begin the synchronization with Outlook?". Clicking Yes will begin the synchronization. Note: Running the synchronization the first time may be fairly time-consuming!