A Payroll Entry is a specialized Operating Expense only utilized to record payroll information and generate Checks for Employees in Design Manager.
To generate a Payroll Entry, select Accounting - Bills & Invoices (Vendor Deposits, Invoices, Expenses). Doing so will display the Vendor Deposits, Invoices, and Operating Expenses Window - New Tab.

Click the Add button to display the Vendor Deposit, Invoice, or Expense window.

On the Type menu, select Payroll Entry. Doing so will cause the Vendor Deposit, Invoice, or Expense Window to reconfigure properly for the Payroll Entry information as shown below.

Enter the proper Employee Code into the Employee field. To locate the Employee Code using the Employee / Manager / Salesperson Search Window, click the Search button. Upon entering or selecting the Employee Code, Design Manager will default all of the Payroll Accounts from the Employee / Manager / Salesperson Window - Payroll Tab into the Payroll Distributions Grid.
Choose the proper method to pay the invoice in the Pay With menu. The Pay With menu option will default to “A Check”. It would be very unusual to pay the Payroll Entry with a Credit Card. If paying with a hand written check or a wire transfer/debit card, click on the Hand Check Wire Transfer (Hand Chk Wire Trans) button to enter the check/transfer information. If a check is going to be physically printed on the printer, do not click the Hand Check Wire Transfer Button.
Enter a description of the Payroll Entry into the Period field. Most commonly the date range for which the Payroll Entry covers is used as the Period (i.e. “10/30/08 through 11/10/08”). A Period, however, must be entered.
Input the date that will appear on the Payroll Check into the Check Date which will automatically transfer into the Due Date.
If any additional Payroll Distributions need to be added, such as a quarterly municipality withholding, click the Add button to display the Payroll Account Distribution Window shown below.
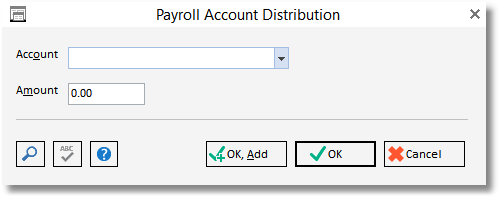
Input the proper Account Number into the Account field for the Payroll Distribution; such as a municipality withholding Liability Account from the example above or a bonus Expense Account for a yearly bonus. To locate the desired Account Number using the Account Search Window, click the Search button.
Enter the proper amount of the Payroll Distribution into the Amount field. Use a positive value for Expenses such as salaries or bonuses and a negative value for Liabilities.
Click OK to save the Payroll Distribution. It will now appear on the Payroll Distributions Grid.
All Distributions can be revised or deleted using the Edit and Delete buttons, respectively. After making all necessary additions or revisions, insure that the Net Pay for the Payroll Entry is correct.
Click OK to save the new Payroll Entry.
The Payroll Entry will now appear on the New Vendor Payables Grid on the New Tab of the Vendor Deposits, Invoices, and Operating Expenses Window. The Payroll Entry can be edited or removed at this point by clicking the Edit and Delete buttons, respectively. To record the Payroll Entry, click the Post button.
If a Check needs to be printed through Design Manager, skip to the section on Printing Checks below.
A full description of the windows mentioned above are available under Vendor Deposits, Invoices, and Operating Expenses Window - New Tab and Payroll Account Distribution Window.
Accounting: Upon posting a Payroll, Design Manager will credit the Accounts Payable Account, credit all Liability Accounts for withholdings, and debit the Expense Accounts for salaries, bonuses, commissions, etc. The Payroll Entry will remain on Accounts Payable until a Check or other form of payment is applied to the Payroll Entry. If the Hand Check Wire Transfer button was used, then Design Manager will further debit the Accounts Payable Account and credit the designated Cash Account.