The third tab on the Item Window is the Picture Tab. Pictures can be associated with the Stock Item which will be included on the Item Window - Picture Tab when the Stock Item is committed to a Project and displayed on the Catalog Listing Report for Inventory Stock Items. The picture will also be displayed on the Stock Item Picture Window when the Stock Item is selected on the Stock Inventory Items Grid of the Inventory Stock Item Glossary Window.
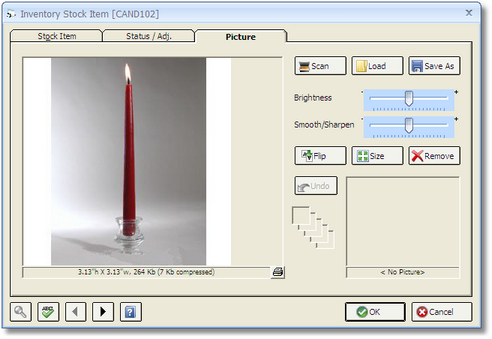
Scan Button: If you have a TWAIN-compatible scanner attached to your computer, you can scan an image directly into the Picture tab by clicking this button. Upon clicking Scan, you will be able to select the appropriate scanner from the Select Source Window.
Load: You can import an existing image on your hard drive or network into the Picture Tab by clicking the Load button. Doing so displays the Design Manager - Load Picture Window from which you can locate and select the image you would like to assign to the Item.
Save As: The Save As button allows you to store the Item's picture in a variety of formats on your hard drive, network, or removable media.
Picture Effects: Several controls are available for customizing the image. As these features alter the image, you'll notice that the original format will be stored in the Picture History in the right-hand corner of the window.
Brightness Bar: Clicking and "dragging" the Brightness bar to the left will reduce the overall image brightness. Conversely, dragging the Brightness Bar to the right will increase the overall brightness.
Smooth/Sharpen (S/S) Bar: Clicking and "dragging" the S/S bar to the left will reduce the sharpness of the image. Conversely, dragging the S/S Bar to the right will enhance the sharpness of the image.
Flip Button: Clicking the Flip button with vertically invert the image.
Size Button: The Size button will launch the Resize Picture Window which allows you to set the dimensions of the image. It is useful to resize the image to smaller dimensions in order to save disk space on your computer and allow Design Manager to process the image faster when printing.
Remove Button: The Remove button will delete the associated image from the Stock Item. Note that the using the Remove button will NOT delete the original image if it was loaded into the Item from your hard drive or network location.
Undo Button: Clicking the Undo button will replace the current image with the most recent image in the Picture History. The Picture History is only available while currently adding or editing the image. Upon saving or canceling the Stock Item, the History is lost.