Design Manager will automatically update the On Hand, Committed, On Order, and Paid For Quantities, along with the Total Cost, as various processes occur in Design Manager. For example, if an Inventory Purchase Order was created for 2 units of a particular Stock Item, the On Order would increase by 2 upon accepting the Inventory Purchase Order. Upon receiving the merchandise using the Inventory Purchase Order Status Window, the On Order Quantity will be reduced by 2 while the On Hand Quantity will increase by the same amount.
However, sometimes you will need to manually change a quantity or cost without actually purchasing, receiving, or selling the Stock Item. One example would be inputting the initial On Hand Quantity and Total Cost when existing Stock Items are first entered into Design Manager. Another example might be reducing the On Hand Quantity and Total Cost to account for breakage. In cases such as these, Inventory Adjustments are used to process the quantity and cost changes.
To adjust an Inventory Stock Item, select Inventory è Stock Items to display the Inventory Stock Item Glossary Window and locate the Stock Item on the Inventory Stock Items Grid. Highlight the Stock Item and click the Edit button to display the Inventory Stock Item Window. Click the Status / Adjustment Tab which is displayed below.

Located in the lower portion of the window is the Adjustments / Transactions Grid which lists all Inventory Transactions pertaining to the Stock Item but is also used to create and manage Inventory Adjustments. Click the Add button to the right the grid to display the Inventory Adjustment Window shown below.
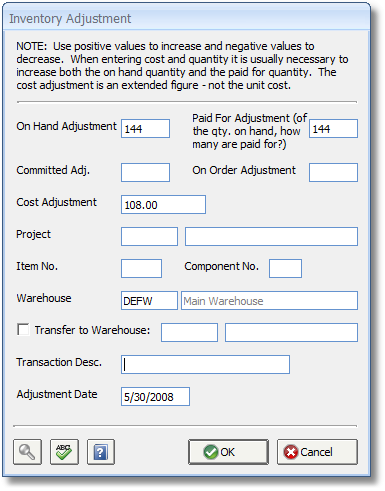
The Inventory Adjustment Window is the interface used to enter the actual quantity and cost changes that are desired. Though the Inventory Adjustment Window has fields to adjust all the Stock Item quantities and cost, not all fields need to be used for a given Inventory Adjustment. In other words, if you are adjusting the On Hand Quantity only, you do not need to input anything into the On Order Adjustment field. These quantities are described in greater detail under the Inventory Stock Item Window - Status / Adjustments Tab. Note: Use positive values to increase the quantities or Total Cost while using negative values to decrease those figures!
On Hand Adjustment: Input the number of units by which to increase or decrease the On Hand Quantity. The On Hand Quantity is the number of units of the Stock Item currently in possession by the company.
Paid For Adjustment: Input the number of units by which to increase or decrease the Paid For Quantity. The Paid For Quantity represents the number of units that are currently On Hand that have been previously purchased in full from the Vendor. More often than not, if the On Hand Quantity is being adjusted, the Paid For Quantity should likewise be adjusted.
Committed Adjustment (Committed Adj.): Input the number of units by which to increase or decrease the Committed Quantity. The Committed Quantity represents the number of units of the Stock Item that has been previously been allocated to Projects and Orders using the Add Items from Inventory function on the Specifications Window or the From Inventory button on the Component Window - Component Tab.
On Order Adjustment: Input the number of units by which to increase or decrease the On Order Quantity which is the number of units of the Stock Item that are currently included on Inventory Purchase Orders but have not yet been received.
Cost Adjustment: Enter the amount by which the Total Cost of the Stock Item needs be altered. Note: The Cost Adjustment affects the Total Cost of the Stock Item and should be entered to change the cost for all units of the Stock Item, not as a per unit adjustment.
Project / Item No. / Component No.: When a Committed Adjustment value is entered, the Project, Item No., and Component No. fields become enabled allowing the user to enter the precise Reference Number for a Specification within a Project to which the Inventory Adjustment for the Committed Quantity will be associated. Note: Generally, to decommit an Inventory Item one should either delete the Item on the Specifications Window or click the Remove button on the Component Window - Component Tab. Therefore, using the Project / Item No. / Component No. fields in this manner is usually reserved for correcting past errors.
Warehouse: A valid Warehouse Code must be entered for each Inventory Adjustment. The Warehouse Code represents which physical location in which the Stock Item is stored is representative of the Inventory Adjustment. For example, if one unit of a Stock Item is damaged so the On Hand Quantity and Total Cost are being reduced, the Warehouse Code indicates in which location the unit resides that was truly damaged. The Warehouse Code may be manually entered or the Search button can be used to locate the desired Warehouse.
Transaction Description: An optional description of the Inventory Adjustment can be entered for your reference. The Transaction Description appears on many Inventory Reports.
Adjustment Date: The date of the Inventory Adjustment.
Transfer to Warehouse: The Transfer to Warehouse function is a convenient tool to quickly create a pair of Inventory Adjustments which represent the relocation of an Inventory Item, or portion thereof, from one Warehouse to another. To do so, enter the proper On Hand, Paid For, Committed, On Order, and/or Cost adjustments for the Warehouse from which the Inventory Item has been removed. Note: all of the adjustments figures must be negative values as they represent the quantities and cost being reduced in the source Warehouse. Then, select the Transfer to Warehouse option in order to enter the Warehouse Code into which the Inventory Item is being moved. Upon clicking the OK button, two Inventory Adjustments, one for each Warehouse, will be created indicating the goods being moved from the source Warehouse into the destination Warehouse.
A common example of an Inventory Adjustment, the initial entering of a Stock Item into Design Manager, will be used to illustrate the Adjustment process. For this example, a Stock Item for a particular throw pillow is being created. When entering an existing Stock Item, such as the throw pillow, into Design Manager, all of the relevant information for the pillow is recorded on the Inventory Stock Item Window - Stock Item Tab. However, Design Manager must still be informed on how many pillows are currently possessed by the company, the total cost of all the units of the pillow, etc. All of which is accomplished by an Inventory Adjustment. To create the Adjustment, click the Add button to the right of the Adjustments / Transactions Grid on the Status / Adjustments Tab on the Inventory Stock Item Window. On the Inventory Adjustment Window, enter the total number of pillows, 10 for example, into the On Hand Adjustment indicating the company has a total of 10 of the pillows to sell to Clients. Next, enter the number of the pillows that have actually been purchased from the Vendor into the Paid For Adjustment. Often, the On Hand and Paid For Adjustments are identical, 10 in this example, but in some cases, the company may have received a new shipment of pillows but not yet paid the Vendor for them. In such an instance, the Paid For Adjustment would be lower than the On Hand Adjustment. Next, if any of the pillows are allocated or ear-marked for a particular Project, the total number of such pillows would be entered into the Committed Adjustment (Committed Adj.). If any pillows are currently ordered from the Vendor, but not yet received by the company, that value would be recorded in the On Order Adjustment. Next, enter the total cost of all the throw pillows into the Cost Adjustment. The Cost Adjustment is not the cost of a single pillow, but, rather, the total value of all the pillows combined. A Warehouse Code must be entered for the Adjustment. If all the pillows are in a single location or the company maintains all Inventory on-site, enter the Warehouse Code as such. If, however, the pillows are spread between multiple locations, an Inventory Adjustment would be needed for each individual location to properly account for the whereabouts of the pillows. Lastly, enter the Adjustment Date, which defaults to the current system date, but can be changed, and an optional Transaction Description can be entered for future reference regarding the Inventory Adjustment. As stated previously, though this example utilized all the quantities along with the Total Cost, more often than not an Inventory Adjustments will only affect one or two of these values.
After clicking the OK button to record the Inventory Adjustment, it will appear on the Adjustments / Transactions Grid. Inventory Adjustments can be revised and removed from the Adjustments / Transactions Grid. If you notice an Adjustment has been incorrectly entered, Simply highlight the erroneous entry on the Adjustments / Transactions Grid and click the Edit button on the right side of the grid. Doing so will display the Inventory Adjustments Window so the prior information may be revised. If an Inventory Adjustment is completely erroneous and should not have been recorded in Design Manager at all, it can be permanently removed it by highlighting the Adjustment on the Adjustments / Transactions Grid and clicking the Delete button. Note: Only Inventory Adjustments can be edited and deleted from the Adjustments / Transactions Grid. Other Transactions, such as Purchase Orders or Sales, must be adjusted in the appropriate area of the software.