The Vendor Tab is the first tab on the Vendor / Payee Window. To add a Vendor, enter a Vendor Code and all other required information into the appropriate fields. To edit an entry, type in the new information. To change a Vendor Code, you must delete the entire entry and add a new entry. See the Delete function on the Vendor Glossary Window.
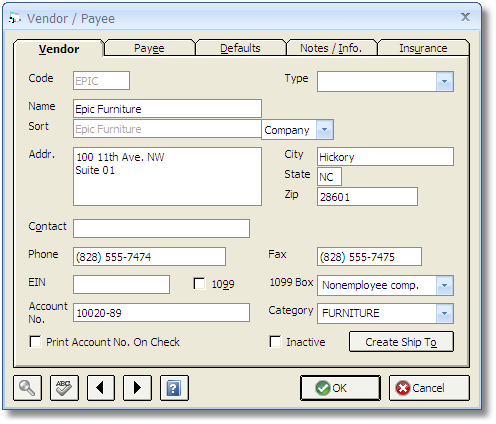
Code: This Code is used to designate a particular Vendor. It must be a unique series of up to five letters or numbers. You may use the first few letters of the name of the Vendor for the Vendor Code.
Name: Type the Name of the Vendor into this field. You can type up to 40 characters. This is the name that will appear on Purchase Orders for this Vendor. If the Vendor has a different name that needs to be printed on Checks issued to them, use the Payee Tab to enter the alternate name.
Type: Vendors can be categorized using the Type selection in any manner you see fit. You can add a new Type, "Contractor" for example, simply by entering it into Type field. After doing so, the "Contractor" selection will be available for all new Vendors. The Type designation can be used to sort and limit Vendors on various reports and windows in Design Manager.
Sort: The Sort selection allows you to decide the alphabetical "order" in which you want to display the Vendor Name on the glossary and certain reports. "Company" will display the name exactly as it appears in the Name field. For instance, if the Vendor Name is "Custom Couches", the Company selection will display the Name exactly as "Custom Couches". When "Name" is selected, Design Manager will attempt to reconfigure the Name with the surname of the individual before the first name. In this case, if the Vendor Name is "John Smith", the Name will be displayed as "Smith, John". "Manual" allows to configure the Sort order of the Name in any manner you wish.
Address: Type the Address, including City, State and Zip code of the Vendor. This is the address that will appear on Purchase Orders for this Vendor. If you need an alternate address to appear on Checks written to this Vendor, use the Payee Tab.
Contact: The Contact is for the name of the primary individual with whom you communicate when contacting this Vendor. Up to 40 characters may be used. Additional contacts, phone numbers, etc. can be entered using the Notes/Information Tab.
Phone: Type the telephone number of the Vendor into this field.
Fax: Type the fax number, if available, of the Vendor into this field. The Fax must be filled in if you intend Design Manager to fax Purchase Orders to the Vendor.
EIN: The government-issued Employer Identification Number of the Vendor can be entered in this box. The EIN is generally an 11-character code used by the government in tracking sales tax information. For corporations and partnerships the EIN number is in the format ##-####### and for individuals or proprietorships it is a Social Security number in the format ###-##-####. You should enter the "-" shown in the examples so it will print on the 1099 forms in the desired format. This information is necessary only if you are required to create a 1099 form for this Vendor.
1099: Check this box if you are required to fill out a 1099 form for this Vendor. Vendors that have the 1099 option selected and have had payments recorded for them over a certain amount, usually 600.00, they will appear on the 1099 Report.
1099 Box: Use this selection to indicate which funds description field on the 1099 Form you wish to record the yearly activity with the Vendor. The choices are Non-Employee Compensation, Rents, Royalties, and Other Income. Most contractors should be set to the Non-Employee Compensation while Rent is used for the Vendor to which you pay any rent. Royalties and other income are not often used. You should contact your accountant if there is any question on how to set this field.
Account Number: Use this field to enter an account number that your Vendor may issue to you. For example, if the Vendor were a credit card company you would enter your credit card number here. The Account Number will automatically print on Purchase Orders issued to this Vendor. This field is optional and can contain up to 20 characters.
Print Account No. on Check: Select this option if you would like the Account Number to print on Checks issued to the Vendor.
Category: This field can contain a descriptive term, up to 20 characters, for the type of goods or services that this Vendor provides. To search for a list of Categories used on other Vendors, click on the Search button. This will open the Vendor Category Search Window. Examples can be detailed such as Furniture, Fabrics and Lighting or more general as Operating or Vendor. The Vendor Glossary Window and certain reports can be sorted by the Vendor Category.
Inactive: If a Vendor still has accounting activity in the General Ledger, but you no longer want to use the Vendor, you can mark the Vendor Inactive. If this option is checked, the Vendor will not appear in the Vendor Glossary nor on certain reports. To reopen an Inactive Vendor, click the Show Inactive option on the Vendor Glossary Window, edit the Vendor, and unselect the Inactive option.
Create Ship To: This button creates a Ship To Code with the same Code as the Vendor along with the Vendor’s Name and Address information into the Ship To Code Glossary. Using this function is convenient if you frequently ship merchandise to this Vendor from other Vendors such as shipping a couch to an upholsterer.