The Print Tab is the first tab on the Company Advanced Options Window and contains default settings for printing Proposals, Invoices, Purchase Orders, and Statements, and other reports.
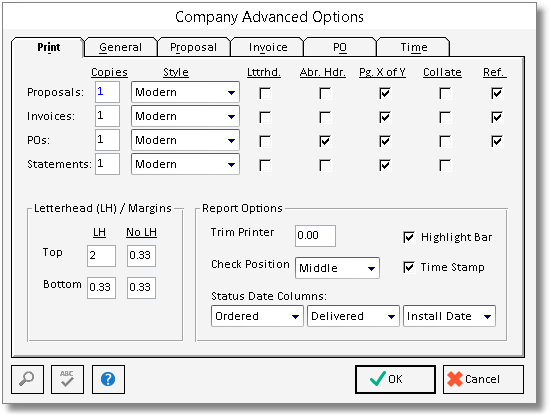
Copies: Enter a number here. This determines how many copies of the respective document will print by default. Please note that the number of copies is only applicable when you print directly to your printer and will not affect the number of copies printed when the document is first displayed on your monitor (print/preview).
Style: This option applies to Proposals, Invoices, Purchase/Work Orders and Statements. (some are limited to Proposal and Invoices only)
| • | Proposal and Invoices ONLY: Select the desired format you wish to use for each document; either Residential, Commercial, Modern, Residential - Show Deposit, Commercial - Show Deposit. Modern - Show Deposit. You can choose to select another style at the time of generating or reprinting the Proposal or Client Invoice. To learn more about these Style Options, see New Proposal Window - Proposal Tab or Re-printing or E-mailing a Client Invoice. |
| • | Purchase/Work Orders and Statements ONLY: Select from the Classic or Modern style formats. Classic resembles the Commercial Style of the Proposal/Invoice; While Modern resembles the Modern style Proposal/Invoice. Unlike the Proposal or Invoice, at the time of generating a Purchase/Work Order or Statement you will not have a choice to select the style. The style can only be selected on this Company Advanced Options Window - Print Tab. To see examples of these Style Options, see New Purchase / Work Order(s) Window or Statements. |
Letterhead: Select this option if you would like the respective document to print on your company letterhead. If Letterhead is not selected, then documents should be printed on plain paper as Design Manager will print your company information including the company name, address and phone number at the top of the page. ***If you are have entered a Logo into the Company Information - Logo tab, be sure that you do NOT have Letterhead selected for the Documents you wish to print using the Logo.
Abbreviated Header (Abr. Header): The company information will only print on the first page of the document to conserve paper. Abbreviated document information will be displayed on subsequent pages.
Page X of Y: Check this option if you would like the total page number count to appear on a document (i.e. "Page 2 of 4" as opposed to "Page 2").
Collate: Check this option if you would like document pages to be collated. Collated: Page 1, 2, 3, 4 / 1, 2, 3, 4. Non-collated: page 1, 1, 2, 2, 3, 3, 4, 4.
Reference Number (Ref. No.): This option applies only to Proposals, Invoices, Purchase Orders and the Budget report. Select this option if you would like Item and Component reference numbers to be printed on a document.
Letterhead (LH) / Margins: Top and bottom margins can be set for letterhead (LH) and non-letterhead (No LH) use. If you want Design Manager to print on your company letterhead, be sure that the Letterhead (Lttrhd.) option above is selected.
Top: Enter a number here to set the default top margin for all documents. You may enter two settings: one to be used with the Letterhead option in the LH column and one setting to be used for blank paper in the No LH column. By default, the software will leave a space that measures two (2) inches from the top of the page to accommodate your company logo, name and address when using the Letterhead option, but you can increase or decrease this value as necessary.
Bottom: Enter a number here to set the default bottom margin for all documents. You may enter two settings: with the Letterhead option in the LH column and one setting to be used for blank paper in the No LH column. Increase this setting if your company has letterhead with print at the bottom of the page. Also, it may be necessary to increase the bottom margin if text is being truncated at the bottom of the page.
Report Options:
Trim Printer Alignment: Adjust the alignment of checks and the 1099 document for differences in printers. Increasing this number will move the printing down on the page, while entering a negative number will move it up.
Check Position: The Check Position menu has three options for printing checks: at the top, middle, or bottom of the page.
Highlight Bar: Shows a light gray strip under every other line of reports. This can be used to improve readability when looking across a line on the report.
Time Stamp: Shows the date and time when the report was printed as opposed to the date only.
Status Date Columns: This allows you to tell the system what dates to print on your Client Status Report. There are 3 Drop Down choices here. Allowing the Client Status Report to show any of the 3 fields you choose (or optionally no fields, 1 field or only 2). Each drop down gives you a choice of the following:
(none) - will not print any of the possible dates
Ordered - Purchase Order Date
Expected Ship Date
Delivered
User Defined Date 1
User Defined Date 2
For Details on these Dates see Purchase/Work Order Status Window and Component Window - Order Status Tab
See Client Status Report for more information on this report.