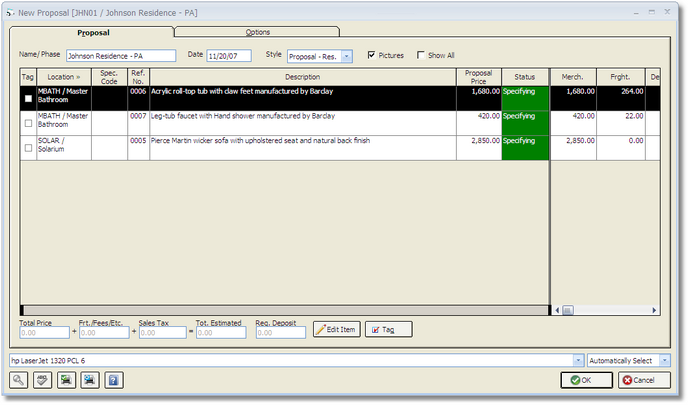
The first tab on the New Proposal Window is the Proposal Tab and is where Proposals for Projects are generated. This tab shows all of the active Items in the Project that are available to be placed on a Proposal for the Client. Once you have "tagged" or selected the Items you wish to propose, you can print a copy of the Proposal. If the information on the Proposal appears to be correct, you can "Accept" the Proposal which will process the document into Design Manager.
Name: This field will show the Project Name by default and will print at the top of the Proposal. You may change the Proposal Name by typing a new name or description into this field. Some designers user this field to designate a particular phase of a job. Defaults for this field may be set on the Project Advanced Options – Proposal Tab, including the option to hide the Proposal Name and to use the Proposal Name in place of the Proposal Number if you want to use your own numbering system.
Date: This field will default to the current system date and will print at the top of the Proposal. You may change the Date by typing a new one into this field or by using the Search button.
Style: You can select to use the Residential Proposal, Commercial Proposal, Bid Specification, or Specification Sheets from the Style menu. In general, the Residential format has a general appearance of a correspondence letter while the Commercial format has a more industrial appearance. Bid Specifications can also generated which are used to show the Quantity, Description, Vendor, and Extended List Price of each Component for an Item. Bid Specifications are primarily used in commercial Projects where detailed information of all purchasing is required. Lastly, Specification Sheets can be printed to show all the Specification Attributes and Special Instructions for an Item. Specification Sheets are discussed in more detail under Using Specification Sheets and Templates. The Style will default from the selection on the Company Advanced Options - Print Tab.
Pictures: Selecting the Pictures option will display the image loaded on the Item Window - Picture Tab for each Item on the Proposal.
Show All: Selecting the Show All option will display all Items within the Project that are not set as Inactive or Complete. Previously proposed Items will appear beneath all Items that have not yet been proposed.
Proposal Grid: This grid lists and displays information for each Item that can be proposed for a Project. By default, the Proposal grid only shows active Items that have not been included on a Proposal previously. Click on the Tag check box to select an Item for inclusion on the Proposal. Double-clicking on any Item will open the Item Window which is useful for making quick adjustments to the Item before proposing. The Proposal Grid is sorted by Location code, followed by the Item reference number within a given Location. Like many grids in Design Manager, you can change the sorting of the Proposal Grid by clicking the heading of the column by which you would like to sort. Some columns, however, are unavailable for sorting.
Tag: Click on this check box to "tag" an Item to include it on the Proposal. To untag an Item, simply click on the check box a second time to remove the check mark. You do not have to include all Items on a Proposal. A Project can have many Proposals. As Items are tagged or untagged, the pricing and deposit totals change at the bottom accordingly.
Already Proposed: If the Show All option is selected, this column will be visible. If an Item has already been proposed, then the Proposal number and date of the last Proposal upon which the Item appeared on will be displayed. You may include an already proposed Item on a new Proposal. Items previously proposed will appear at the bottom of the Proposal grid.
Location: This column contains the Location code and name of the Item.
Group: If the Item Groups option on the Company Advanced Options Window - General Tab is selected, the Item Group will be displayed.
Specification Code (Spec. Code): The Specification / Template Number of the Item.
Reference Number (Ref. No.): This column contains the Design Manager Reference Number assigned to each Item and is useful for finding the Item on the Specifications Window.
Description: This column contains the first few words of the Item’s Description.
Proposal Price: The total price of the Item being proposed to the Client will be displayed here.
Merchandise (Merch.): The portion of the Item price that is categorized as Merchandise is displayed in this column.
Freight: The portion of the Item price that is categorized as Freight is displayed in this column.
Design Fee: The portion of the Item price that is categorized as Design Fee is displayed in this column.
Installation: The portion of the Item price that is categorized as Installation is displayed in this column
Labor: The portion of the Item price that is categorized as Labor is displayed in this column
Time: The portion of the Item price that is categorized as Time is displayed in this column.
Requested Deposit: This columns contains the Deposit Amount required from the Client for an Item.
Quantity: The Quantity of Item being proposed is recorded in this column.
Sales Tax: This column contains the total estimated amount of Sales Tax for the Item.
The following fields are located below the Proposal Items Grid and apply to the entire Proposal:
Total Price: The total price contains the total Estimated Price of all Items being proposed not including any fees, freight, other charges, or sales tax being applied to the Proposal.
Freight / Fees / Etc. (Frt. / Fees / Etc.): This field contains the total amount of all Freight charges, Design Fees, and any other charges being included on the Proposal.
Sales Tax: This field contains the total Estimated Sales Tax being recorded on the Proposal.
Total Estimated (Tot. Estimated): The Total Estimated field is the sum of the Total Price, Freight/Fees, and Sales Tax.
Requested Deposit (Req. Deposit): This field contains the total deposit that you will require from the Client. This amount is calculated by summing each tagged Item’s requested Deposit Amount.
Tag: Click on this button to open the Tag Items for a Proposal Window. This window contains several options for Item "tagging" or selecting groups of Items to be included on a Proposal. You may also tag individual Items by clicking on each Item’s Tag check box on the Proposal Grid. See the Tag Items for a Proposal Window for more information.
Edit: If you wish to make changes to an Item before generating the Proposal, you can select the Item on the Proposal grid and click the Edit button. This will display the Item Window where you can make the necessary revisions. Double-clicking the Item on the Proposal grid will also launch the Item Window.
Printing Proposals:
After tagging the desired Items, click on the OK button to print the Proposal. Make sure that you have the Printer selection on the Printer Button Bar set to the desired printer. For more information on printing options, see Printer Button Bar. Whether printing the Proposal to the monitor or directly to the printer, you will need to either accept or reject the Proposal after printing and reviewing it.
Accepting and Rejecting Proposals:
After printing a Proposal, Design Manager will ask "Would you like to accept or reject this Proposal?". Be sure to thoroughly review the Proposal before clicking the Accept button. If you find any errors on the Proposal, click the Reject button and correct those errors. You can then generate and print the Proposal again.