Upon posting Vendor Payables, the physical Checks for the Payables will eventually need to be printed in order to be sent to the Vendor. For information on recording Vendor Payables, see Entering Vendor Invoices. To do so, select A/P è Checking (Print Checks, Checkbook, Credit Cards, Reconcile) which will display the Checking Window shown below.
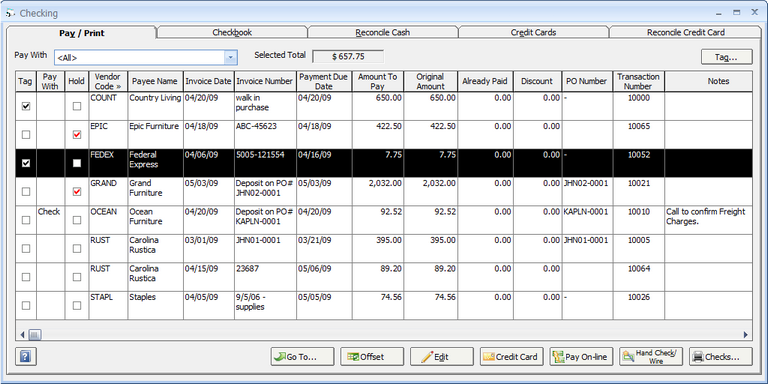
The Checking Window has five tabs: Pay/Print, Checkbook, Reconcile Cash, Credit Cards, and Reconcile Credit Cards. The first tab is the Pay / Print Tab where Payables are selected for Checks to be generated, Hand Check/Wire Transfer information can be recorded, existing entries can be paid with a Credit Card, and other functions.
The Pay / Print Tab contains the Open Payables Grid which lists all of the Operating Expenses, Vendor Invoices and Deposits, and Payroll Entries that have been entered and are unpaid or have been only partially paid. If the Hand Check / Wire Transfer button is used when entering the Payable, it will not appear here as it has been recorded directly into the Checkbook. By default, all open Payables will be listed. Only Payables associated with a particular Accounts Payable Payment Type can be displayed by selecting the desired Payment Type on the Pay With menu. For more information, see Accounts Payable Payment Types and the Company Information Window - A/P Payment Tab. Tag each Payable for which a Check needs to be printed by clicking the box in the Tag column of the Payable. The Tag button can also be used to automatically select all Payables with Due Dates on or before a certain date. Once the desired Payables have been tagged, press the Print button to open the Check Run Window.
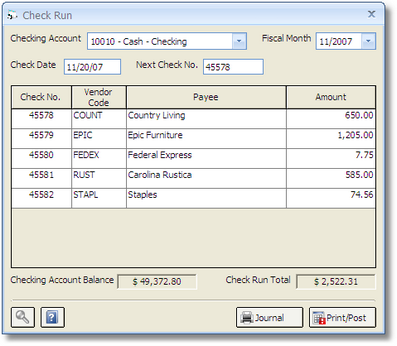
Choose the Checking Account into which the payments will be recorded on the Checking Account menu. After doing so, the selected Payables will appear on the Checks Grid. Multiple Payables intended for the same payee will be included on a single Check. If this is the first set of Checks being recorded through Design Manager or checks have been lost or damaged, the Next Check Number (No.) will need to be set to the number of the first check upon which Design Manager will print. The Check Date will default to the current date but can be changed as desired. The Check Date will print on the Check(s) and determines the date upon which the Check(s) will appear in the Checkbook. The Fiscal Month determines into which Fiscal Period will the Disbursement transactions be recorded upon accepting the posted Checks.
Important: Make sure that the Next Check Number is correct! It should match the number on the check that will be first inserted through the printer.
If all of the information on the Check Run Window appears to be correct, press OK to print the Check(s). Once the Checks have been reviewed to insure that they have printed correctly, the user will need to Accept or Reject the Check run. If any of the Checks have printed incorrectly, press Reject and make the necessary changes. Upon clicking Accept, the Payables will be removed from the Open Payables Grid and the Checks will be entered into the Checkbook.
Note: Only upon clicking the Accept button are the Checks entered into the Checkbook of Design Manager! If the Checks are rejected and inadvertently sent to the payees, Design Manager will have no record of their existence!
For a full description of the features on the Checkbook Window, see Checking Functions.
Accounting: When Checks are posted, Design Manage will credit the Checking Account selected on the Check Run Window and a debit the Accounts Payable Account.