The Schedule Tab allows a unique time line to be constructed for each Project. The tab, however, will be disabled until a valid Project is entered into the Project field.
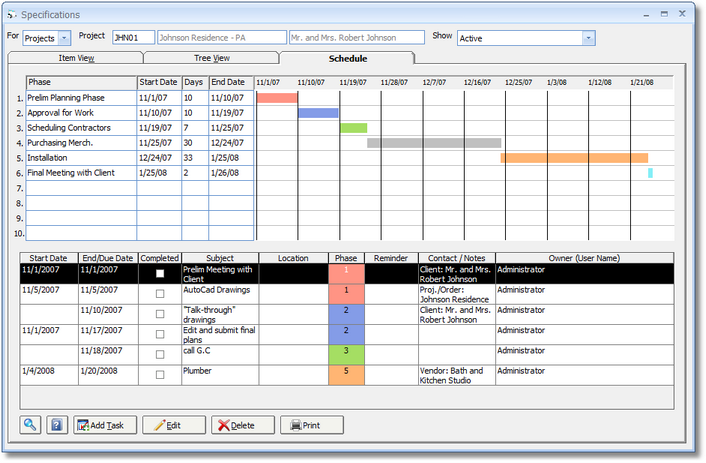
Phases entered on the Company Information Window - Schedule Tab will automatically be displayed in the Phase column of the Project Schedule Grid for each new Project. Design Manager will also calculate Start Date and End Date for each Phase as follows:
| • | The Start Date of the first Phase is the Opened Date of the Project from Project Window - Project Tab. Design Manager then adds the number of days in the Duration of the Phase to the Start Date to determine the End Date. The Start Date is always the first day of the Phase. For example, if the Start Date is 9/3/200X with a Duration of 10 days, the End Date would be 9/12/200X. |
| • | The Start Date of each subsequent Phase begins on the End Date of the prior Phase and the length of the Phase is determined by the Duration as described above. |
A Project's Schedule can be customized as necessary. All of the Start and End Dates can be adjusted appropriately. The length of the Phase can be altered by simply changing the Duration or by changing the Start and/or End Dates which will then automatically adjust the Duration. Phases can be added by inputting the activity name into the Phase column and the proper Start Date and Duration. Phases can be removed by deleting the activity name from the Phase column.
Design Manager will calibrate the intervals of the color-coordinated Phase Chart depending on the total length of time between the Start Date of the first Phase and the End Date of the last Phase. Each Phase is automatically assigned an individual color. The colors, however, cannot be changed by the user.
A Task can be created from the Schedule Tab by clicking the Add Task button and will automatically be designated to be included on the Project Schedule. Tasks are activities that need to be monitored until their completion. When creating a Task from the Schedule Tab, the Link to Project field will display the current Project Code from the Project field. The Show on Project Schedule option will be selected and disabled, indicating that the Task is required to be included on the Schedule. The appropriate Phase can also be optionally assigned to the Task. For a full discussion on creating Tasks, see To Do List Tasks and Appointments and To Do List Task and To Do List Appointment Windows. All Tasks set to Show on the Project Schedule, whether created from this tab, the Specifications Window - Item View Tab, or the To Do List Tasks and Appointments Window will always be displayed on the Project Schedule Task Grid including Tasks designated as Completed. Tasks can be changed or permanently removed by selecting the desired Task on the Project Schedule Task Grid and clicking the Edit and Delete buttons, respectively.
The Print button can be used to generate the Project Schedule Report which displays a graphic representation of each Phase including the Phase name, Start Date, Duration, and End Date. Further, all Tasks designated as Show on Project Schedule will appear on the Project Schedule Report as well. If the Task has been assigned to a Phase, it will be displayed beneath that Phase. Tasks not assigned to a Phase will be listed beneath all Phases.