The Item View Tab is dominated by the Items Grid which lists all the Items that have been created for the Project to date. By default, the Items Grid lists the Items in Reference Number order. Like most grids in Design Manager, however, the Items can be sorted by any of the columns simply by clicking the heading of the desired column.
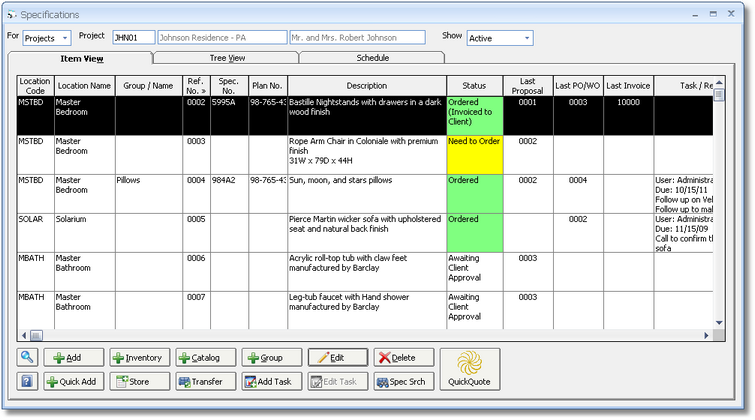
Items Grid: The Items Grid has the following columns:
| • | Location Code: The Code of the optional Location assigned to the Item, if present. |
| • | Location Name: The Name of the optional Location assigned to the Item, if present. |
| • | Group / Name (optional): If Item Groups are being utilized, the Group Name will be displayed in this column. |
| • | Reference Number (Ref. No.): The unique, sequential 4 digit number assigned to each Item in the Project. |
| • | Specification Number (Spec. No.): The optional Specification Number of the Item. |
| • | Plan Number (Plan No.): The optional Plan Number of the Item. |
| • | Description: The first few lines of the Client Description of the Item will be shown in the Description column. As with all grid columns in Design Manager, hovering the mouse pointer over the column will display the full contents of the cell. |
| • | Status: The color-coded current Status of the Item will be displayed in this column. A Right-click with the mouse on the Status column allows the user to set the Status of the Item from the Status Menu. A full explanation of Item Status Types is described later in this chapter under Item Status Types and the Company Information Item Status Tab. |
| • | Last Proposal: If the Item has been included on a previous Proposal to the Client, the most recent Proposal Number will be displayed. |
| • | Last Purchase Order (PO): If any of the Components of the Item have been included on a previous Purchase Order, the most recent Purchase Order Number will be displayed. |
| • | Last Invoice: If the Item has been included on a previous Client Invoice, the most recent Invoice Number will be displayed. |
| • | Inactive: The Inactive column indicates whether or not the Item is currently designated as Inactive. An Item can also be set as Inactive, if allowed, by simply clicking the checkbox in this column. |
| • | Complete: The Complete column indicates whether or not the Item is currently designated as Complete. An Item can also be set as Complete by simply clicking the checkbox in this column. |
| • | Task / Reminder: If a Task has been linked to the Item, the User, Due Date, and Subject of the Task will be displayed in the Task / Reminder column. Creating a Task / Reminder for an Item will be discussed later in this chapter and a full explanation is available in To Do List Tasks and Appointments under Additional Features. |
| • | First Vendor: The Vendor Code and Name of the first Component for the Item. |
Following the Items Grid are the Specifications Management buttons each of which will be described briefly here as all will be fully explained later in this chapter.
Add and Edit: The Add and Edit buttons will display the Item Window to create a new Item or change the selected Item on the Items Grid, respectively. For a full description of the Item Window, see Entering Items below.
Delete: Upon selecting an Item and clicking the Delete button, one of two actions will occur:
| • | A message stating "Are you sure you want to delete this Item along with all of its Components?" will be displayed. Clicking the Yes button will permanently delete the Item and all of its Components. Clicking the No button will leave the Item as is. |
| • | A message stating "This Item cannot be deleted . . ." along with the reason preventing the Item from being deleted will be displayed. You can, however, set the Item as Complete by clicking the checkbox in the Complete column. |
Note: Designating Items as Complete is a good practice. Many windows and reports are designed to selectively ignore Complete Items and will, therefore, be more efficient if you maintain a smaller list of active Items.
Inventory: The Inventory button displays the Add Item from Inventory Window which allows a user to select an Inventory Item from the Inventory Stock Item Glossary and commit it to the Project as an Item. Committing an Inventory Item to a Project will be described in full under Adding Items from Inventory below.
Catalog and Store: The Catalog button displays the Add Item from the Catalog Window which allows a user to select a Catalog Item from the Catalog Glossary and import it into the Project. Conversely, the Store button allows the user to create a new Catalog Item from the selected Item using the Store Item in Catalog Window. Retrieving a Catalog Item and storing an Item in the Catalog will be described in full under Using the Catalog.
Group: The Group button displays the Add a Group of Items Window which allows a user to retrieve an Item Group and import it to the Project as an Item or series of Items. Creating and importing Groups to a Project will be described in full under Using Groups later in this chapter.
Quick Add: Quick Add launches the Quick Add Line Items Window which is a very useful interface for rapidly creating Specifications by entering minimal information such as the Description, Location, Vendor, Quantity, etc.. A full explanation is provided under Quick Add Line Items Window.
Transfer: The Transfer button provides a method of moving cost of some or all of an Item's Components to Inventory or to another existing Project through the Transfer Project Item Window. The Transfer process will be described in full under Transferring Specifications to Other Projects or Inventory below.
Create Task: Clicking the Create Task button displays a new To Do List Task from the To Do List Tasks and Appointments system with the Link Project/Item set to the Project and Item currently selected on the Items Grid. Again, creating a Task / Reminder for an Item will be discussed later in this chapter and a full explanation is available in To Do List Tasks and Appointments under Additional Features.
Specification Search (Spec. Search): The Specification Search button launches the Specification Search Window which allows the user to enter a variety of criteria in order to locate particular Items and Components throughout Design Manager. For more information, see the Specification Search Window later in this chapter.