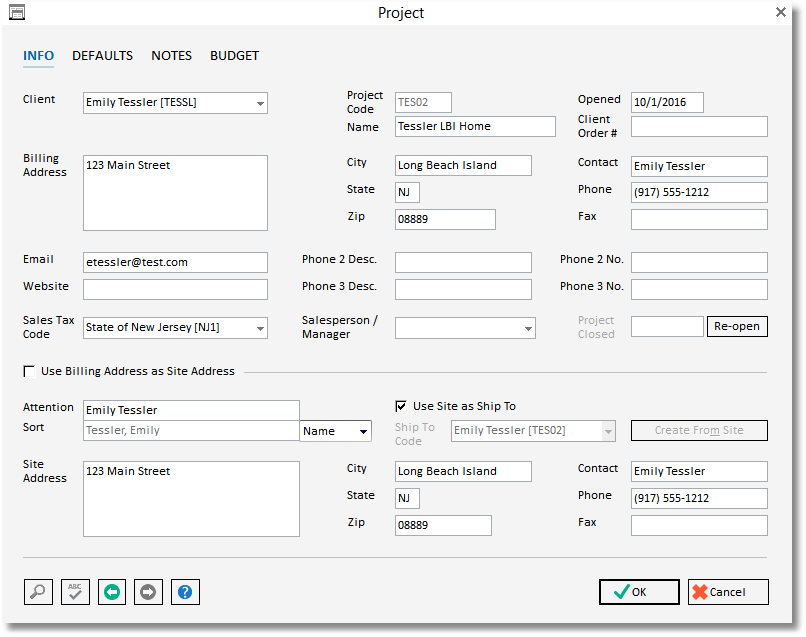
The first tab on the Project Window is the Info Tab. This tab is where basic client and Project information is entered including client contact information.
Each field on the Project Tab is described below:
Client: This is the Code of the Client for which the Project has been created. Selecting or inputting a Client Code will default the Address, Contact, Phone, Fax, and Salesperson/Manager from the Client Window to facilitate the creation of the Project To search for a Client Code, or to create a new Client, place the cursor into this field and click on the Search button in the lower left corner of the window. For a detailed explanation of Clients, see the Client Glossary Window.
Project Code: The Project Code is a unique series consisting of up to 5 characters that represents a Project or job in Design Manager. A Project Code will be automatically created based upon the Client Code and how many Projects already exist for the Client. You can, however, change this Project Code, at this time, to use any unique Project Code of up to 5 alphanumeric characters. Utilizing Project Codes that are easy to remember is good practice, as the Code will be used throughout Design Manager whenever a reference is made to the Project.
For example: Design Manager will enter "SMI01" for the Project Code that has "SMITH" as the Client Code.
Project Name: Type the Name of the Project into this field. The Project Name should not be confused with the Client Name (see Client field below). The Project Name should be descriptive of the Project site or of the design services being provided. For example, if the Client’s name is John Smith, then the Project Name might be "Smith - Florida Home". The name can be up to 40 characters.
Billing Address: The Billing Address, with the City, State, and Zip Code, will be defaulted from the Client Window upon entering or selecting a valid Client Code. The information can then be revised if necessary. The Billing Address should contain the location where you want a Client’s bills to be sent for the Project. This address may be the same as the Project Site address, but it does not have to be.
Opened: The Opened Date represents the date that a Project was created in Design Manager. When creating a new Project, the Opened Date is defaulted to the current system date but may be changed to any valid date.
Closed: If the Project has been closed, the Date that is was closed on will appear here.
Client Order Number (#): The Client Order Number is an optional field used to enter an order number given to you by a Client. If the Client is a hospital or other institution, they may ask you to record their Purchase Order number on any correspondence sent to them. Use this field to record that number as it will print on any Proposals and Invoices for this Project. Again, this field is optional and may be left blank. The Client Order Number can be up to 16 characters.
Contact: The Contact name will be defaulted upon inputting a Client Code and represents the name of the main contact for this Project. If you do not have a contact other than the Client, you may leave this field blank.
Phone: The Phone number will default to the Client Phone number but should be the main phone number for contacting individuals concerning this Project. Additional contacts and phone numbers concerning the Project can be entered on the Notes Tab.
Fax: Enter the Fax number for a Project here. The Fax number will be defaulted from the Client information. If you do not have a Fax number, you may leave this field blank.
Email: Use this field to enter an e-mail address for a Project. When reprinting a Proposal or Invoice for emailing to your Client, this address will default in the "Send To" field on the email message. If you need to enter multiple addresses, use a semicolon to separate each address, or use the Notes field on the Notes Tab.
Website: The Internet web address pertaining to a Project or Client can optionally be recorded here.
Phone 2 Description/Number: Use this field to record the name of an additional contact. An example might be "John’s cell". The cell number can then be typed into the Phone 2 No. field to the right.
Phone 3 Description/Number: Use this field to record the name of an additional contact. The number can then be typed into the Phone 3 No. field to the right.
Site / Shipping Information: If this is the same as the Billing Address, select the Site Address is the same as Billing Address check box. If the Site / Shipping Addresses differs from the Billing address, enter the new address here. For example, if a Client lives mainly in New York and the Project you are working with them on is in Florida, then the Site Address would be his or her Florida address and the Billing Address would be his or her New York address, if they wish to receive their bills in New York.
Default PO Ship To is the Same as the Site: Select this check box if the default Ship To Address for Purchase Orders will be the same as this Site Address. If the address differs, select or add a Ship To Code for the Ship To Code field.
Sales Tax Code: The Sales Tax Code tells Design Manager how to charge sales tax for Items in a Project. While the cursor is in this field, use the Search button in the lower left corner of this window to search for a Sales Tax Code. If there are no codes on the Sales Tax Code Search Window, then press the Add button below the list to create a new one. You will need to have at least one Sales Tax Code for the state in which you live. For a detailed explanation of Sales Tax Codes, see the Sales Tax Code Glossary Window.
Salesperson / Manager: You may choose to enter the Employee / Manager / Salesperson Code for individual who is primarily responsible for this Project. The Employee Code from the Client Window will be defaulted upon selecting a Client Code. However, you can use the Search button to locate or add an Employee to the Employee / Manager / Salesperson Glossary Window to select a different Employee. Several reports can be printed using the Salesperson / Manager Code.