Once you have entered a Vendor Invoice or a Deposit, you will need to print the actual Check to send to the Vendor. For information on entering bills or creating Vendor Deposits, see Sending a Vendor a Deposit, Entering an Invoice from a Vendor, Paying a Bill or Entering a Miscellaneous Expense.
Open the Checking Window by clicking on the Pay Bills and Checkbook button on the tool bar.

The Checking Window has six tabs: Pay Bills /Print Checks, Make Bank Deposit, Checkbook, Reconcile Cash, Credit Card Activity, and Reconcile Credit Card. The Pay Bills / Print Checks Tab is where Payables are selected for Checks to be generated, information for other payment methods can be recorded, existing entries can be paid with a Credit Card, and other functions.

The Pay / Print Tab contains the Open Payables Grid which lists all of the Operating Expenses, Vendor Invoices and Deposits, and Payroll Entries that have been entered and are unpaid or have been only partially paid.
If the Pay Now ![]() button is used when entering the Payable, it will not appear here as it has been recorded directly into the Checkbook.
button is used when entering the Payable, it will not appear here as it has been recorded directly into the Checkbook.
You will need to tag the Payables for which a Check needs to be printed by clicking the Tag column next to the Payable. You can also click the Tag ![]() button to automatically select all payables with Due Dates on or before a certain date.
button to automatically select all payables with Due Dates on or before a certain date.
Once you have tagged the desired payables, press the Checks ![]() button to open the Check Run Window.
button to open the Check Run Window.
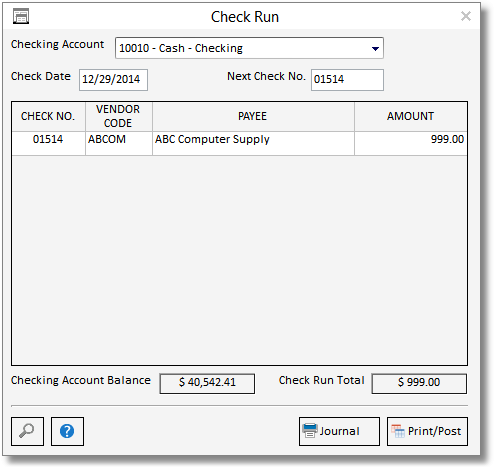
Choose the Checking Account into which the payments will be recorded on the Checking Account menu. After doing so, the selected Payables will appear on the Checks Grid. Multiple Payables intended for the same Payee will be included on a single Check. If this is the first set of Checks being recorded through Design Manager or checks have been lost or damaged, the Next Check Number (No.) will need to be set to the number of the first check upon which Design Manager will print. The Check Date will default to the current date but can be changed as desired. The Check Date will print on the Check(s) and determines the date upon which the Check(s) will appear in the Checkbook.
Important: Make sure that the Next Check Number is correct! It should match the number on the check that will be inserted first through the printer.
If all of the information on the Check Run Window appears to be correct, press Print/Post ![]() to print the Check(s).
to print the Check(s).
To Print a Disbursements Posting List - use the Journal ![]() button before posting the checks.
button before posting the checks.
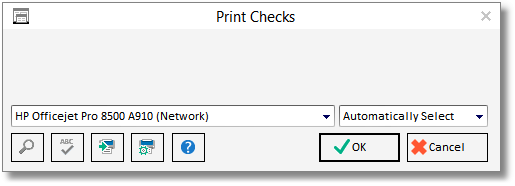
Be sure to select the proper printer and choose OK.
Once the Checks have been reviewed to insure that they have printed correctly, the user will need to Accept or Reject the Check run. If any of the Checks have printed incorrectly, press Reject and make the necessary changes. Upon clicking Accept, the Payables will be removed from the Open Payables Grid and the Checks will be entered into the Checkbook
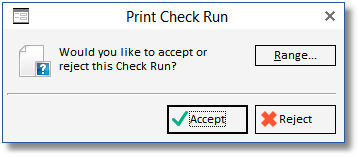
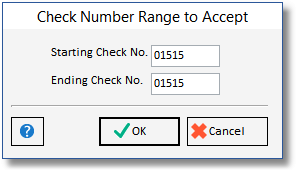
Choosing the ![]() button will open a window for you to select a check number range to accept. Use this if you wish to Accept only a specific range of checks in the check run.
button will open a window for you to select a check number range to accept. Use this if you wish to Accept only a specific range of checks in the check run.
Note: Only upon clicking the Accept button are the Checks entered into the Checkbook of Design Manager! If the Checks are rejected and inadvertently sent to the Payees, Design Manager will have no record of their existence!
For a full description of the features on the Checkbook Window, see Checking Functions.
Accounting: When Checks are posted, Design Manage will credit the Checking Account selected on the Check Run Window and a debit the Accounts Payable Account.