The Projects and Specifications Window is used to enter basic Client and Project information, as well as Locations, Items, and Components for each Project. For each Project, you will need to set up the information only once. The information is then available for reference or editing throughout the life of the Project. The tool bar at the top of the window offers all the necessary Project and specifying functions. When a function is unavailable, the corresponding button will appear gray or disabled on the tool bar.
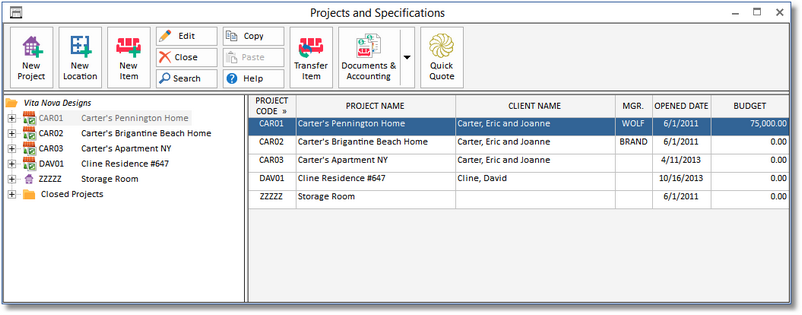
Projects are arranged on the left side of the window in a tree structure called the Specifications Tree. At the top of the tree should be your company’s name, followed by each Project Code and Project Name and a ZZZZZ Project for a Storage Room. If you have closed any Projects, they will be included in the Closed Projects folder at the bottom of the tree.
Clicking on the plus sign (+) next to a Project Code, or using the "+" key on your keyboard with the Project highlighted, will expand the tree branches for that Project, showing all of its Locations and folders for Completed and Inactive Items. Clicking on the minus sign (-) next to the Project Code, or using the "-" key on your keyboard with the Project highlighted, will close the branches leaving only the Project Code and Name visible. The diagram’s hierarchy is shown below:
Projects
Locations
Items
Components
...
...
Completed Items
Inactive Items
...
...
Closed Projects
The Specifications Grid on the right side of the window provides another view of the Project information. When a Project is highlighted on the tree, the Project will also appear highlighted on the grid and vice versa. Like many grids in Design Manager, clicking on any of the grid’s column headings will sort the list alphabetically by that heading, in ascending or descending order. To search a column that you have sorted, type the first few letters of the record you are looking for and the grid will position to the closest match.
Tool Bar: The buttons at the top of this window allow you to perform several different functions. Clicking an entry on the tree will highlight it and enabled the appropriate buttons on the tool bar. When a function cannot be completed, the corresponding button will appear gray or disabled. These buttons are described below:
 New Project: The New Project button will always be enabled, allowing you to click it. Doing so opens the Project Window used to input all information relevant to the Project. See Creating a New Project for a detailed explanation of generating Projects and the Project Window.
 New Location: The New Location button will launch the Location Window allowing you to create a new Location for the current Project.
 New Item: The Item button will launch the Item Window allowing you to create a new Item for the current Project. If you have a particular Location highlighted when clicking the Item Button, the Item Window will be displayed with the current Location Code and Name already entered.
![]() Edit: Clicking on the Edit button will allow you to view and edit the object (i.e., Item, Location, etc.) that is currently highlighted.
Edit: Clicking on the Edit button will allow you to view and edit the object (i.e., Item, Location, etc.) that is currently highlighted.
![]() /
/ ![]() Delete (Close/Delete): Clicking on the Delete button will allow you to delete an object that is currently highlighted. A warning will appear to alert you if an entry may not be deleted. For example, a Project cannot be deleted once a Proposal has been issued for the Project and an Item cannot be deleted if it has been invoiced to the Client.
Delete (Close/Delete): Clicking on the Delete button will allow you to delete an object that is currently highlighted. A warning will appear to alert you if an entry may not be deleted. For example, a Project cannot be deleted once a Proposal has been issued for the Project and an Item cannot be deleted if it has been invoiced to the Client.
| • | When clicking the Close/Delete button while a Project is highlighted, you will be asked if you want to close or delete the Project. Selecting Yes will close the Project. Selecting No will attempt to permanently delete the Project. Remember, Projects cannot be deleted if they have any Proposals, Purchase Orders, financial activity, etc, but they still can be closed. Closed Projects can be reopened be selecting the Project within the Closed Folder and clicking the Edit button. On the Project Window - Project Tab simply click the Re-open button. Closed Projects do not appear on the Project Search Window or on certain reports. |
| • | Clicking the Delete button when a Location is highlighted will ask you to delete the Location and all of the Items and Components contained within the Location. Note that the special <No Location> Location cannot be deleted. |
| • | Clicking the Delete button when an Item is highlighted will ask you to delete the Item and all of its Components. |
| • | Clicking the Delete button when a Component is highlighted will ask you to simply delete the Component. |
![]() Copy: The Copy button will allow you to copy Locations, Items, and Components from one Project to another or even within the same Project. Highlight the information you wish to copy, and then click the Copy button. Place the cursor in the exact position to where you wish to copy the information. Then click on the Paste button (see below). For example, to copy an Item from one Project to another, highlight the Item, and then press Copy. Now go to the destination Project, select the desired Location and press Paste.
Copy: The Copy button will allow you to copy Locations, Items, and Components from one Project to another or even within the same Project. Highlight the information you wish to copy, and then click the Copy button. Place the cursor in the exact position to where you wish to copy the information. Then click on the Paste button (see below). For example, to copy an Item from one Project to another, highlight the Item, and then press Copy. Now go to the destination Project, select the desired Location and press Paste.
![]() Paste: The Paste button works in conjunction with the Copy button (see above). Once information has been copied, click on the exact place where the information is to be inserted. Then click on the Paste button. The information will continue to be displayed under the original Project, as well as the beneath the new Project(s). The Paste button appears gray (disabled) unless you have highlighted a valid object to receive the copied information. Certain information such as purchasing and client invoicing information will not appear in the newly pasted objects.
Paste: The Paste button works in conjunction with the Copy button (see above). Once information has been copied, click on the exact place where the information is to be inserted. Then click on the Paste button. The information will continue to be displayed under the original Project, as well as the beneath the new Project(s). The Paste button appears gray (disabled) unless you have highlighted a valid object to receive the copied information. Certain information such as purchasing and client invoicing information will not appear in the newly pasted objects.
![]() Help: The Help button will access the Design Manager Help System.
Help: The Help button will access the Design Manager Help System.
 Transfer Item: The Transfer Item button will display the Transfer Item Window used to quickly and accurately move an Item, or individual Components within an Item, to a different Project. For a full description, see Using the Item Transfer Window.
 Documents and Accounting: The Documents and Accounting button will display the Documents and Accounting Window positioned to the current Project on tree/grid. Using the arrow to the right of the button allows you to position to particular entries on the Documents and Accounting Window depending on what object is currently highlighted on the Specifications Tree or Grid. For example, if an Item is highlighted, clicking the arrow will allow you to position to any Client Invoice, Proposal, Purchase Order, etc. associated with Item to save time in locating the entry for which you are searching.
![]() Search: The Search button displays the Specification Search Window.
Search: The Search button displays the Specification Search Window.
 Quick Quote (displayed with the optional Quick Quote for Design Manager): The Quick Quote button launches the Quick Quote Window which is described in Quick Quote for Design Manager.