The Documents and Accounting Window is used to do all of the accounting and document printing functions in Design Manager. With it you can create Proposals, Purchase and Work Orders and Client Invoices, enter Client Deposits, Retainers, Payments, Vendor Invoices, General Ledger Journal Entries, Miscellaneous Cash Receipts and more. Please note that some functionality will not be available unless you have purchased the optional Accounting module.
All of this information is displayed on the three tabs of the Documents and Accounting Window: Projects, Vendors, and Journal Entries and Miscellaneous Receipts (Journal Entries and Misc.).
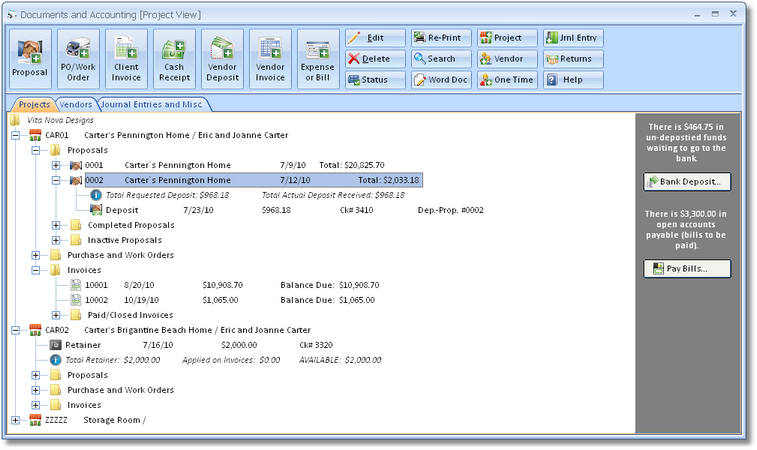
The buttons on the tool bar at the top of the window allow you to perform all accounting and document printing functions within Design Manager. When a function is not available, the corresponding button will appear disabled. Only a portion of the tool bar buttons will be available if you have not purchased the Accounting module.
Tabs: The Documents and Accounting Window has three different tabs for viewing information: ![]() Project, Vendor, and Journal Entries and Miscellaneous Cash Receipts. Just click on the tab heading to switch between different tabs. Each tab has several folders for organizing your data.
Project, Vendor, and Journal Entries and Miscellaneous Cash Receipts. Just click on the tab heading to switch between different tabs. Each tab has several folders for organizing your data.
Project: The Project tab has folders for Proposals, Purchase and Work Orders, and Client Invoices. In addition, any Retainers for the Project will be displayed. Projects are listed alphabetically by Code. All information for a Project can be viewed by clicking on the plus (+) sign to the left of the Project. You can then click the + sign in front of the Proposal, Invoice, or Purchase and Work Orders folders. Each of these folders will have sub-folders to contain older or completed documents and accounting transactions. Current or active documents and accounting entries may be present beneath the main folders. If a folder does not have a + sign, there are no entries recorded within the folder.
Vendor: The Vendor tab lists all Vendors and Employees alphabetically by Code. To view information for a Vendor, click on the + sign to the left of the Vendor. Vendor information is divided into two folders: Purchase and Work Orders and Operating Expenses and Miscellaneous Bills (Operating Expenses and Misc. Bills). Operating Expenses and Miscellaneous Bills are further subdivided by date. Employee information is also divided into two folders: Purchase and Work Orders and Expenses and Payroll Entries. Again, these sub-folders will further be divided by date. The first folder is always the current year plus any future months. Inside the current year folder, the first folder holds the current month plus any future entries. As accounting entries are created, they will appear under the appropriate date folder.
Journal Entries and Miscellaneous Cash Receipts (Journal Entries and Misc.): This tab shows Company accounting information which is divided into General Ledger Journal Entries and Miscellaneous Cash Receipts. Both sections are subdivided by date. The first folder is always the current year plus any future months. Inside the current year folder, the first folder holds the current month plus any future entries. As accounting entries are created, they will appear under the appropriate date folder.
Buttons representing all the major functions in Design Manager are available along the top tool bar of the Documents and Accounting window. Additional functions will be available depending on the object that is currently highlighted on the tree.
 Proposal: Click the Proposal button to generate a new Proposal for the Project currently highlighted.
 Purchase Order / Work Order (PO/Work Order): Click the Purchase Order / Work Order button to generate a new Purchase or Work Order for the Project currently highlighted.
 Invoice: Click the Invoice button to generate a new Client Invoice for the Project currently highlighted.
 Cash Receipt: On the Project tab, clicking the Cash Receipt button will allow you to enter Retainers, Deposits on Proposals, or Payments on Invoices for a Project. Clicking the Cash Receipt button in the Journal Entries and Miscellaneous Cash Receipts tab will allow you to record a Miscellaneous Cash Receipt.
 Vendor Deposit: Click the Vendor Deposit button to generate a new Deposit to be sent with a Purchase or Work Order.
 Vendor Invoice: Click the Vendor Invoice button to enter a new Vendor Invoice or bill that you have received for a Purchase or Work Order.
 Expense or Bill: While on the Vendor tab, you can enter an Operating Expense/Bill for a particular Vendor by clicking the Expense/Bill button.
![]() or
or ![]() Edit/Adjust: Click the Edit button to make changes to the selected entry on the Documents & Accounting Window. You may not be allowed to edit certain entries. For example, a Purchase Order cannot be edited if a Vendor Invoice has been posted for the Purchase Order.
Edit/Adjust: Click the Edit button to make changes to the selected entry on the Documents & Accounting Window. You may not be allowed to edit certain entries. For example, a Purchase Order cannot be edited if a Vendor Invoice has been posted for the Purchase Order.
When a Client Invoice is selected on the Documents & Accounting tree, the Edit button will switch to Adjust. Clicking the Adjust button allows you to create an Invoice Adjustment for the selected Invoice.
![]() or
or ![]() Delete/Void: Click the Delete button to permanently remove the highlighted entry such as Purchase or Work Orders and Proposals, on the Documents & Accounting Window. You may not be allowed to delete certain entries. For example, a Proposal cannot be deleted if a Deposit has been recorded against it.
Delete/Void: Click the Delete button to permanently remove the highlighted entry such as Purchase or Work Orders and Proposals, on the Documents & Accounting Window. You may not be allowed to delete certain entries. For example, a Proposal cannot be deleted if a Deposit has been recorded against it.
When an accounting transaction such as a Retainer, Payment on a Client Invoice, Vendor Invoice, etc. is selected, the Delete button switches to Void. Again, certain entries might not be able to be voided such as a Vendor Invoice that has a Check written against it.
![]() or
or ![]() Status/Apply: The Status button will be available when you have selected a Proposal or Purchase/Work Order the Documents and Accounting Window. The Purchase Order Status Window is used to input order tracking and receiving information for the Purchase Order. The Proposal Status Window is used to monitor or set the status of the Proposal based primarily upon whether or not all Items have been invoiced to the Client. For more information, see the Purchase Order Status Window and the Monitoring and Setting the Status of a Proposal.
Status/Apply: The Status button will be available when you have selected a Proposal or Purchase/Work Order the Documents and Accounting Window. The Purchase Order Status Window is used to input order tracking and receiving information for the Purchase Order. The Proposal Status Window is used to monitor or set the status of the Proposal based primarily upon whether or not all Items have been invoiced to the Client. For more information, see the Purchase Order Status Window and the Monitoring and Setting the Status of a Proposal.
When a Retainer is selected, the Status button switches to Apply. Clicking the Apply button will display the Apply Retainer Window to easily distribute a Retainer to unpaid Client Invoices or as Deposits on existing Proposals. The Apply Retainer Window is discussed in detail in Using the Apply Retainer Window.
![]() Reprint: Click the Reprint button to print a copy of the selected Purchase/Work Order, Proposal, or Client Invoice.
Reprint: Click the Reprint button to print a copy of the selected Purchase/Work Order, Proposal, or Client Invoice.
![]() Search: This button displays the Transaction Search Window from which you can quickly locate particular accounting entries by entering various criteria.
Search: This button displays the Transaction Search Window from which you can quickly locate particular accounting entries by entering various criteria.
![]() Word Document (Work Doc): Click the Word Document button to display the Create Word Document Window where you can generate a Microsoft Word document from a list of templates using the information from a highlighted Vendor or Project. For more information on using the Create Word Document Window, see the Address Book Window.
Word Document (Work Doc): Click the Word Document button to display the Create Word Document Window where you can generate a Microsoft Word document from a list of templates using the information from a highlighted Vendor or Project. For more information on using the Create Word Document Window, see the Address Book Window.
![]() Project: You can create a new Project from the Documents and Accounting Window, as well as the Project & Specifications Window, by clicking the Project button. This will display the Project Window to add a new Project.
Project: You can create a new Project from the Documents and Accounting Window, as well as the Project & Specifications Window, by clicking the Project button. This will display the Project Window to add a new Project.
![]() Vendor: You can create a new Vendor by clicking this button. This will display the Vendor/Payee Window to add a new Vendor.
Vendor: You can create a new Vendor by clicking this button. This will display the Vendor/Payee Window to add a new Vendor.
![]() One Time: See One-Time Vendor.
One Time: See One-Time Vendor.
![]() Journal Entry (Jrnl Entry): Click the Journal Entry button to record a new General Ledger Journal Entry.
Journal Entry (Jrnl Entry): Click the Journal Entry button to record a new General Ledger Journal Entry.
![]() Returns: Click the Returns button to easily record refunds and credits from both Clients and Vendors on the Returns and Credits Window.
Returns: Click the Returns button to easily record refunds and credits from both Clients and Vendors on the Returns and Credits Window.
![]() Help: Click the Help button to view the context-sensitive Help for the Documents and Accounting Window.
Help: Click the Help button to view the context-sensitive Help for the Documents and Accounting Window.